
I love the Sound of Music, but why is the song, My Favorite Things, considered a Christmas song? Who knows, but I know what one of my favorite things is, and it’s also one of my family’s favorites: homemade Danish pastries on Christmas morning. Even in July, someone will say, “I can’t wait for Christmas so we can have Danish pastries!”
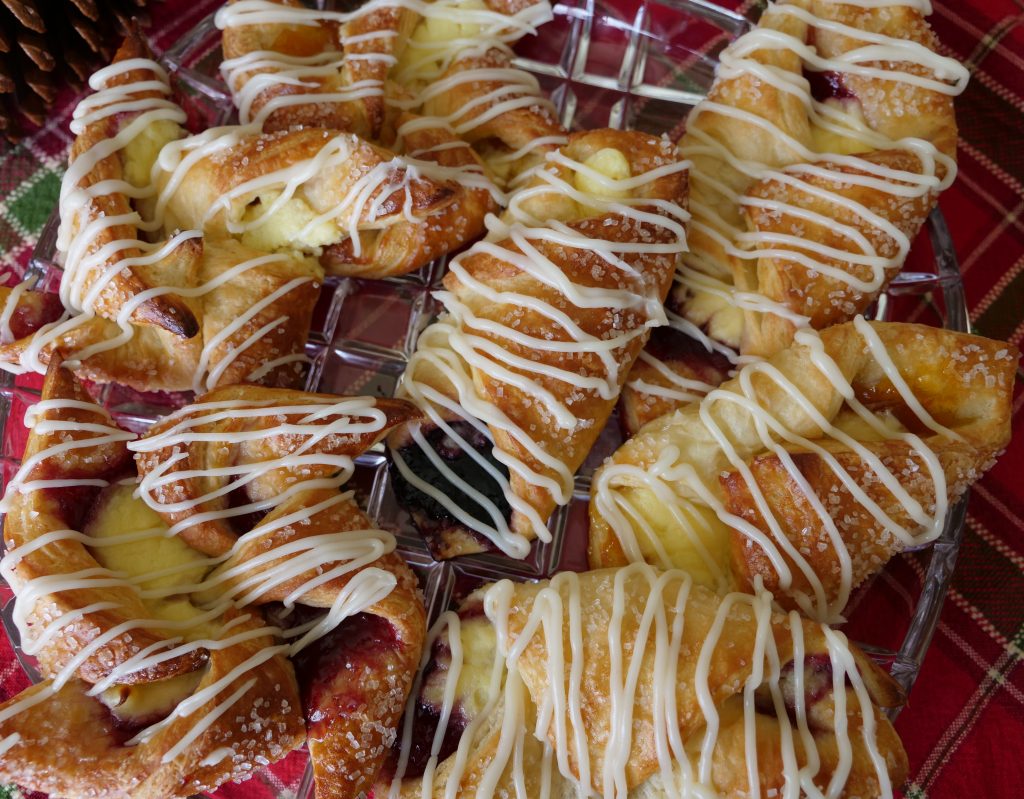
I love the way they fill my home with their sweet aroma, the way the fresh-from-the-oven pastry has the slightest crust yet melts in your mouth, topped with a comforting vanilla glaze and large grained sugar sprinkles, melding perfectly with the fruit jam and cream cheese pastry cream tucked inside. Heaven on a plate!
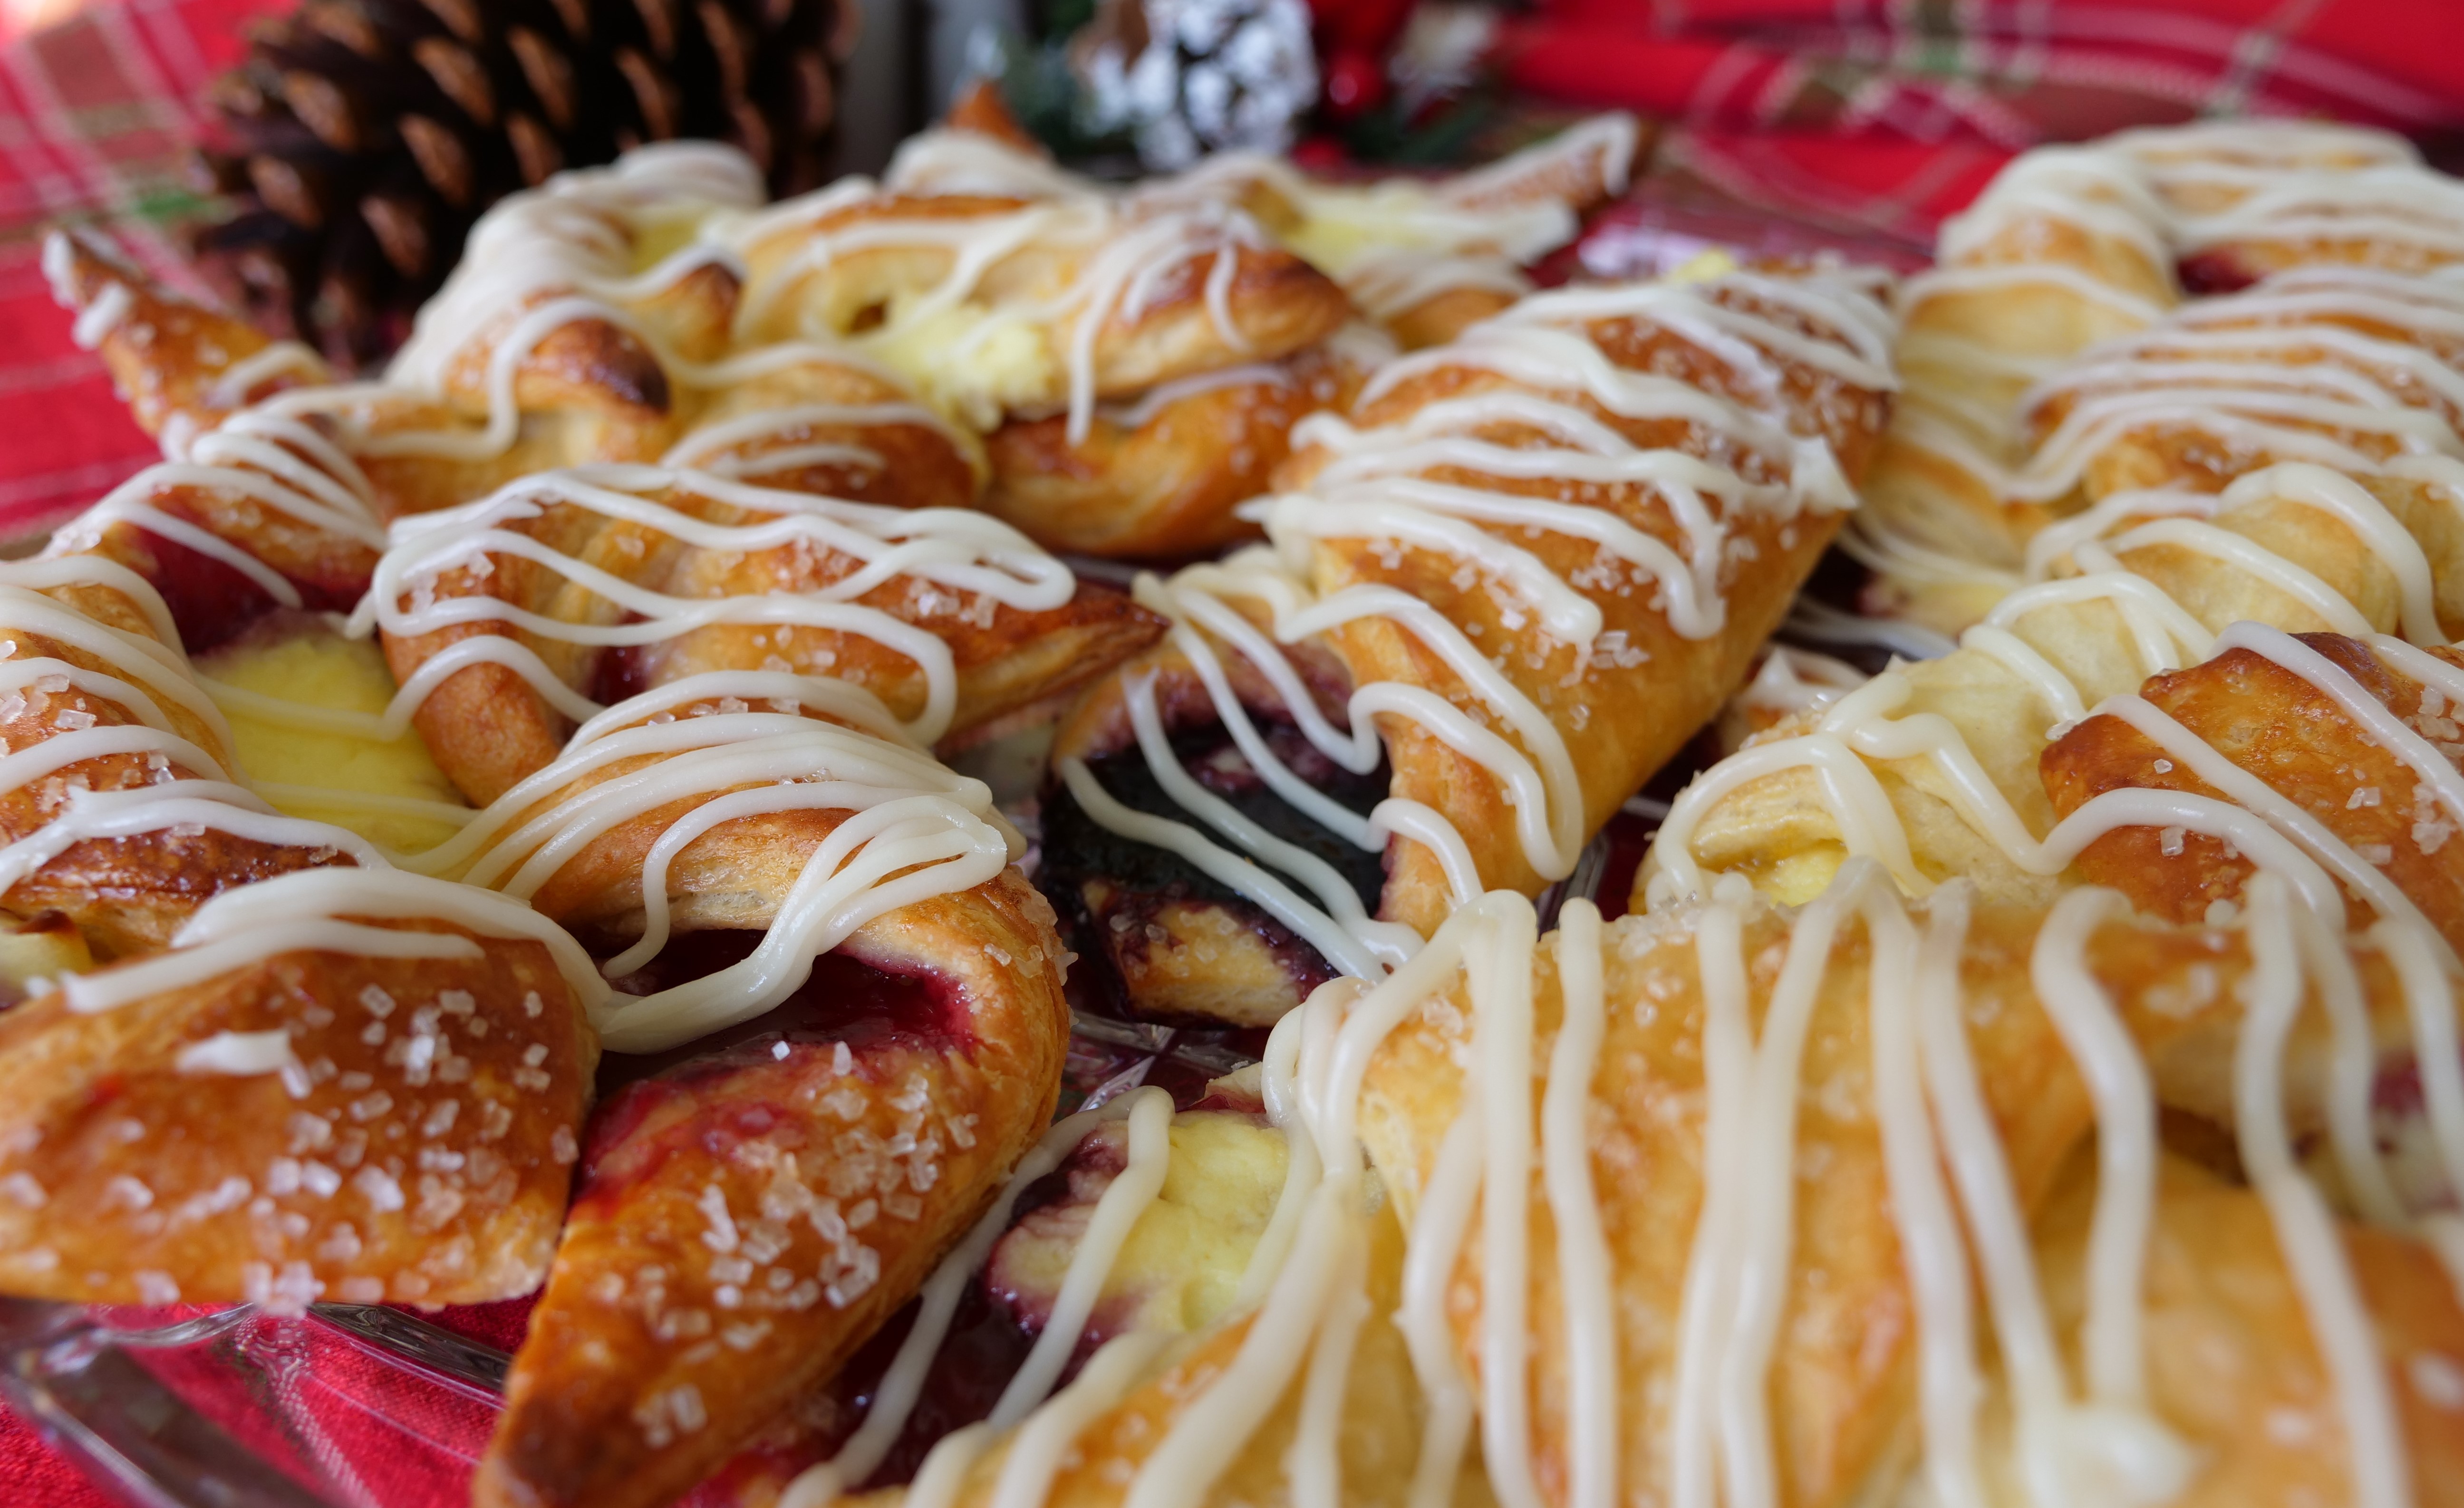
Honestly, you can’t go and find homemade Danish like this just anywhere. This is not like what you find at any chain restaurant, and it’s rare to find made from scratch at even a local bakery.
This recipe is a bit complicated, but not beyond the reach of most home bakers. You might want to do a trial run to work the kinks out first. But even if you don’t take on a baking project like this for the holidays, be sure and celebrate whatever traditions you have with your family. It might be baking cookies from store-bought dough, or just opening a package of Oreos so the kids can leave cookies for Santa. Whatever your traditions,your kids will remember them for a lifetime.
This recipe is from the Baking with Julia Child cookbook, from the PBS series of the same name. I’ve put my own spin on it in a few places, but not the dough ingredients. My copy is literally falling apart, but I highly encourage you to find one. It’s filled with lots of my favorite things!
Homemade Danish
The Dough
In a bowl, stir together:
¼ cup warm (not hot) water
2 ½ teaspoons of active yeast, or one packet
Once dissolved together, add:
½ cup whole milk, room temperature
1 beaten egg, room temperature
¼ cup sugar
1 teaspoon kosher salt
In another bowl, cut in
2 sticks cold unsalted butter (8 oz)
Into
2 ½ cups unbleached all-purpose flour
There are several ways to do this. You can combine the flour and the butter, cut into small chunks, for several seconds in a food processor. Or you could shred the cold butter into your flour with a large grater. Either way, make sure the butter is still in visible pieces, thin but around ½ inch in length. The key to this method is that when you fold and roll the dough later, you need pieces of butter to create the layers in the dough that give it that near-croissant quality.
Once the flour and butter are ready, use a spatula and pour the wet ingredients into the dry ones and stir them around, just until the dry flour disappears. Remember, you don’t want to get rid of the small butter chunks.
Cover the bowl with plastic and put in the refrigerator overnight. Yes, overnight. I’ve gotten by with a 4-hour chill, but overnight is best. It will rise just a tad but more importantly, develop a wonderful flavor,as well as chilling the butter.
When you’re ready, take out the chilled dough and dump it out on a floured surface. You’ll need some space!
First, pat the dough into a rough square, using a bit of flour as needed to keep it from sticking, and roll into a 16-inch square. Fold it into thirds, as the Julia Child cookbook says, like a business letter. I can’t think of a better way to describe it! Now it’s rectangle shaped
Roll this rectangle out, so the long side is 24 inches and the short side is 10 inches. You might have to turn your dough around a few times as you roll it. Fold the rectangle into thirds again, and this time, roll into a 20-inch square. Keep using flour as needed and if at anytime you feel your dough is getting a little warm and harder to handle, you can pop it back in the refrigerator for a few minutes. I usually don’t have to do this, especially in a winter kitchen.
After the 20-inch square, fold into thirds again and roll into another 24 by 10-inch rectangle. Now you can fold into thirds and set the dough, wrapped in plastic, back in the refrigerator, for up to 2 days if you like. It might need at least a half hour to firm back up. You can also freeze the dough and let it thaw overnight in the refrigerator, something I plan on trying myself this year to save time.
Forming the Pastries
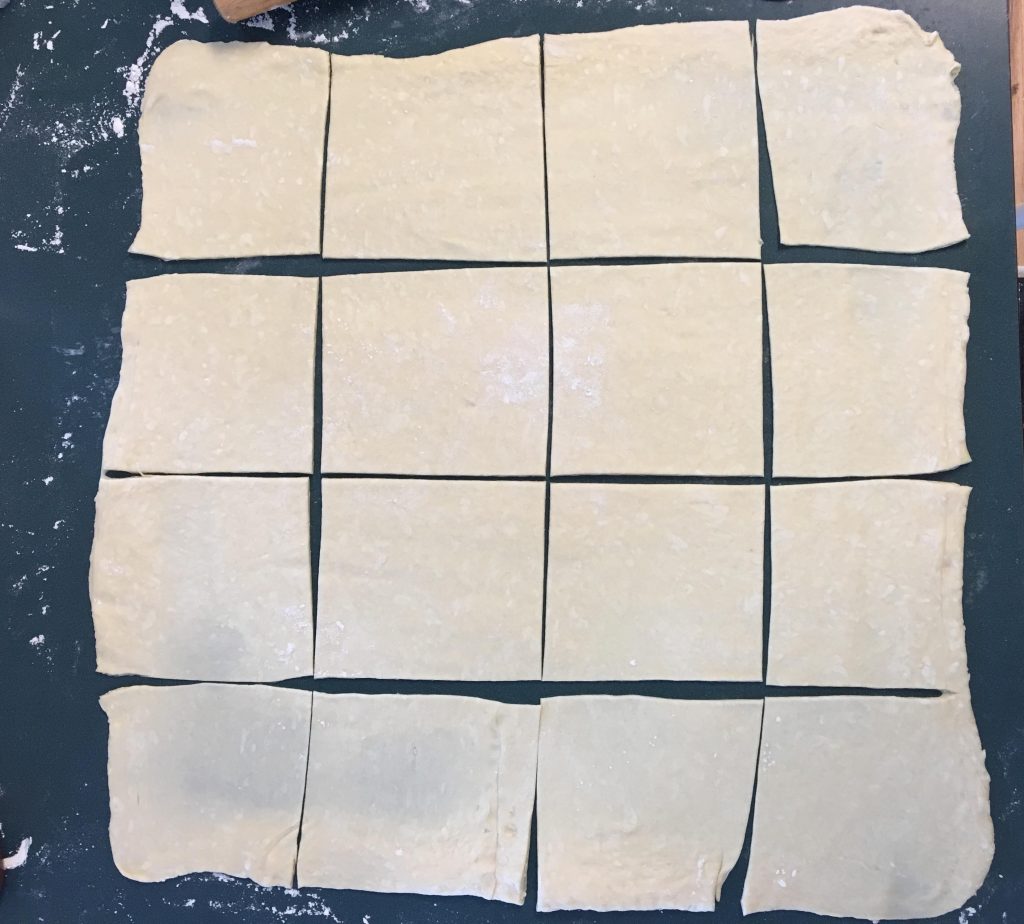
Remove the chilled rolled dough and for the last time, roll it out into a 20-inch square. Be as precise as you can this time, because you’ll now cut the dough into 16 squares, by measuring and cutting at 5-inch intervals on each side. I use a ruler and make little nicks in the edges with a pizza cutter, then cut straight lines to form the squares. The squares on the edges can sometimes be a little irregular, but that doesn’t matter.
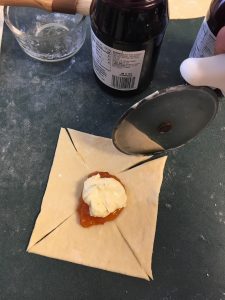
The Spandauer

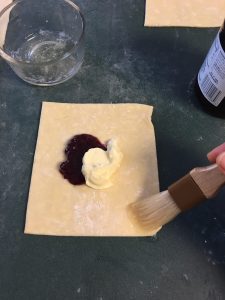
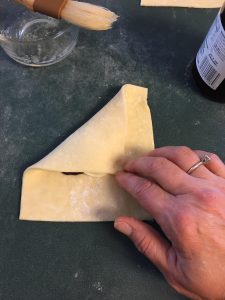
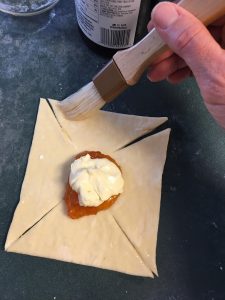
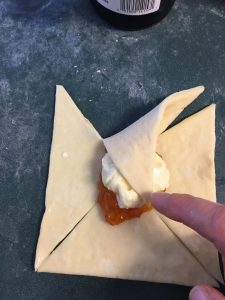
You can make the squares into a variety of shapes, the easiest being the Spandauer. Put a spoonful of your favorite jam—I like to use seedless raspberry, blackberry, apricot, or peach—along with a spoonful of cream cheese pastry cream. (recipe below). Brush a bit of beaten egg white on two opposite corners, then lay one side over, then the other. That’s it!

The Pinwheel

So pretty and not hard to do. Use a pizza cutter to make slits from each corner part way in. Put the jam and cream filling in the middle.Brush the beaten egg white onto the first corner of each cut section, then fold them over in order. The egg white will keep the edges together when baking.


Proofing..
Put the pastries onto either parchment or silicon mat lined baking sheets and cover with a light towel for 30 minutes. Don’t expect these to double in size, but they will be a little puffier. While waiting, get your oven up to 400 degrees.
After 30 minutes, brush the pastries with the egg white allover the top and sprinkle with course or pearl sugar. Bake at 400 degrees for 8 to 10 minutes, until golden brown. THEY WILL BROWN QUICKLY so don’t get distracted and let them go over the time. (Ask me how I know this!)
Take them and let them cool on the sheet for a few minutes,then remove to your serving tray and drizzle with vanilla glaze. (recipe below).Don’t’ be surprised if some of the jam might have boiled out onto your cookie sheet, especially if you overfill them the first time. Eat pastries while warm if possible—heaven!
Cream Cheese Pastry Cream
In a glass measuring cup, bring to a boil:
1 cup half and half (you can use milk if you like)
While your liquid is heating, beat in a mixer bowl, until light and fluffy:
3 large egg yolks
1/3 cup sugar
pinch of salt
Then add and mix in:
2 tablespoons cornstarch
Put your mixer on low and take your hot half and half and SLOWLY pour it down the side, continuing to mix until well combined. Cook on high in the microwave for one minute. Stop and stir. Cook it another minute and stop and stir. Continue to cook for 30 seconds at a time or less, until the mixture thickens. Your microwave’s power will determine how long this takes.
Once thickened, stir until smooth and add 2 teaspoons of vanilla extract. Let cool completely and chill, covered, in the refrigerator.
To add the cream cheese, let 8 oz of cream cheese reach room temperature. Beat it well until creamy, then beat in the cooled custard. This recipe is easily doubled or tripled as needed.
Vanilla Glaze
Mix together and stir until smooth:
1 ⅓ cup powdered sugar
3 tbsp. melted butter
2 tsp. corn syrup
1 tsp. vanilla
2 tbsp. cream or milk
Comments 2
You are so amazing 😉 Thank you for recipes. Merry Christmas 🎄
Author
Karen,
Oh my, thank you for your kind words! On my side of the camera, I never know who is watching but I always hope people enjoy it. Thanks for taking the time to encourage me. Merry Christmas to you, too!
Blessings,
Julie