This week on Daytime Tri-Cities, we’re answering viewers’ holiday baking questions!
Thanks to everyone who submitted a question, but I only had time to go for 13 Q & A’s on the show. Feel free to leave a comment if YOU have a baking/cooking question of your own. Happy Holidays!
Jean asks,
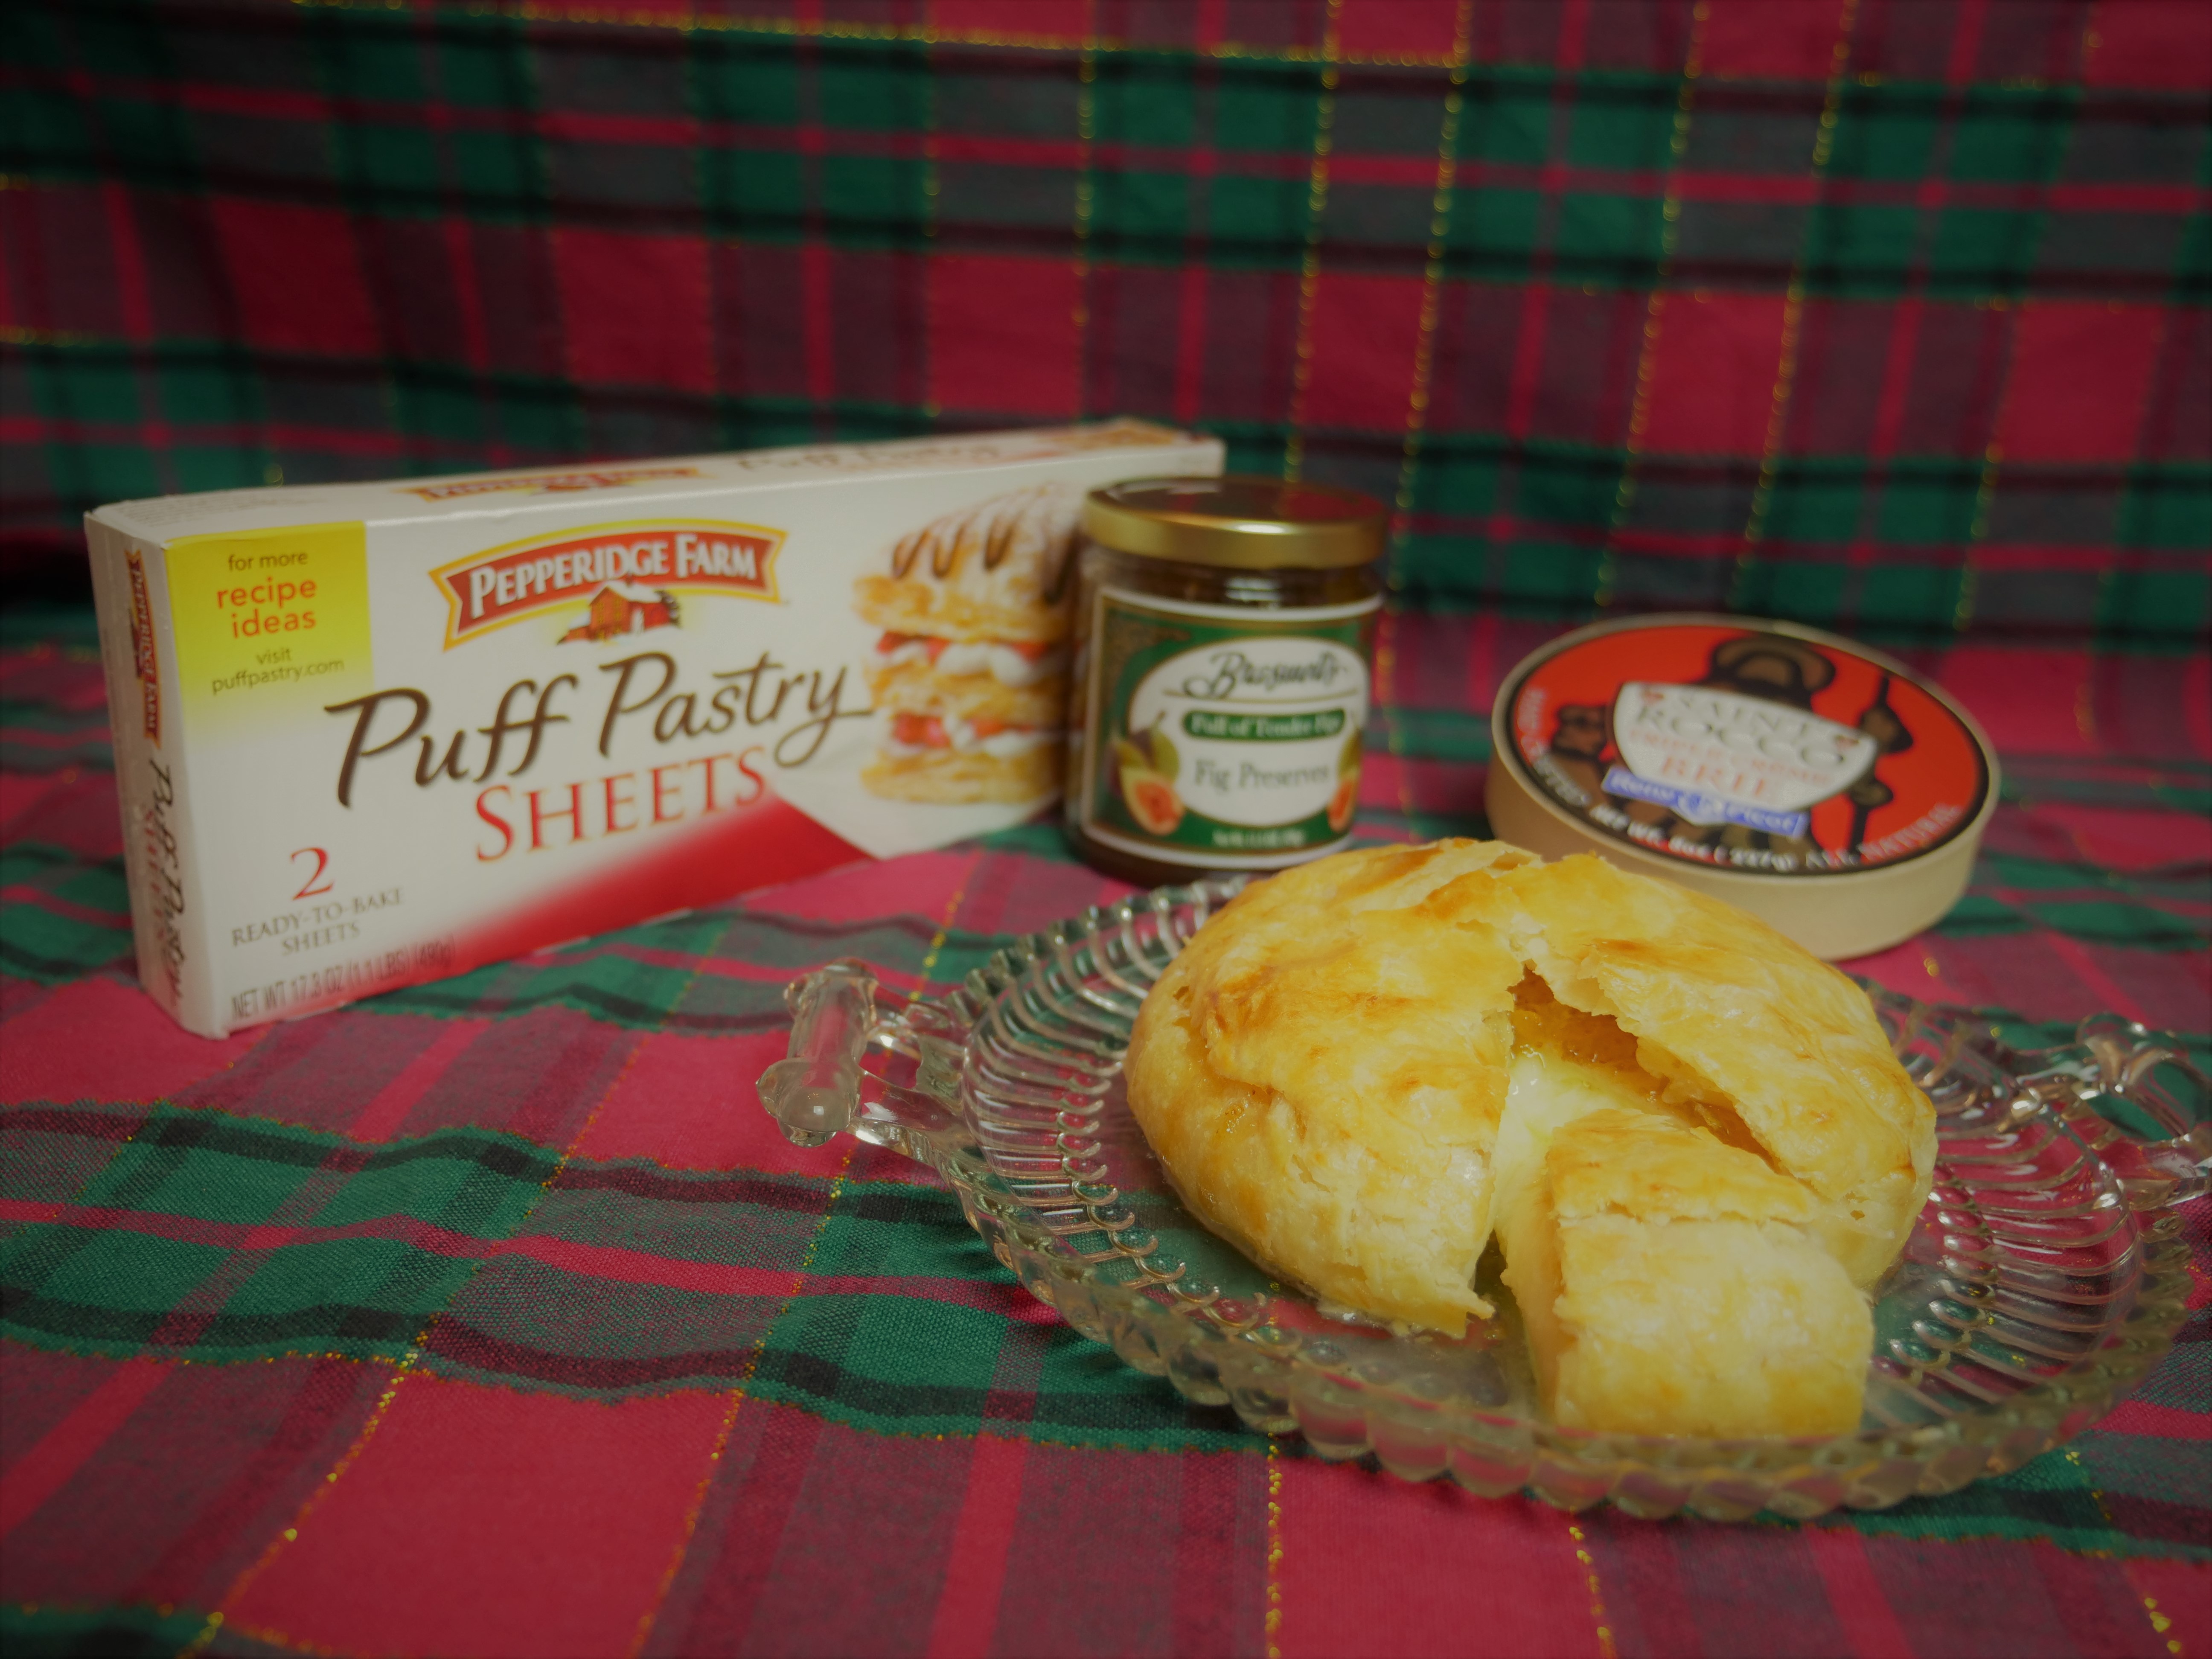
“I am looking for a recipe for baked brie. Can you help? Thanks, loved your segment on Daytime.”
Thanks so much for watching and I’m glad you enjoy my segments! Baking brie is very simple. Buy a package of frozen puff pastry. Remove one sheet and let it warm up on the counter for 30 minutes or so. You might need both sheets if you have a large wheel of brie, but mine was small. Roll out the puff pastry (if you have a 9 inch square, roll it out to a 12 inch square) and set your unwrapped brie on the pastry and cut it so you can come up an inch over the top of all sides of your brie. Cut out a circle the same size as the top. I used the wooden lid that packaged it. If you want, put a few spoonfulls of a jam or chutney on top. Place the circle piece of pastry on top, roll up the sides and the top to seal, and put in the refrigerator for 30 minutes. Turn on your oven to 400 degrees and get out a pie pan. Place the chilled brie/pastry in the pan, and brush the pastry top and sides with one egg yolk beaten with a tablespoon of milk. Cook for 10 minutes at 400 degrees, then lower the oven to 350, until the pastry is golden brown, about 30 minutes or so. Remove from the oven and let cool for an hour before serving.
Jenny and Tina ask,
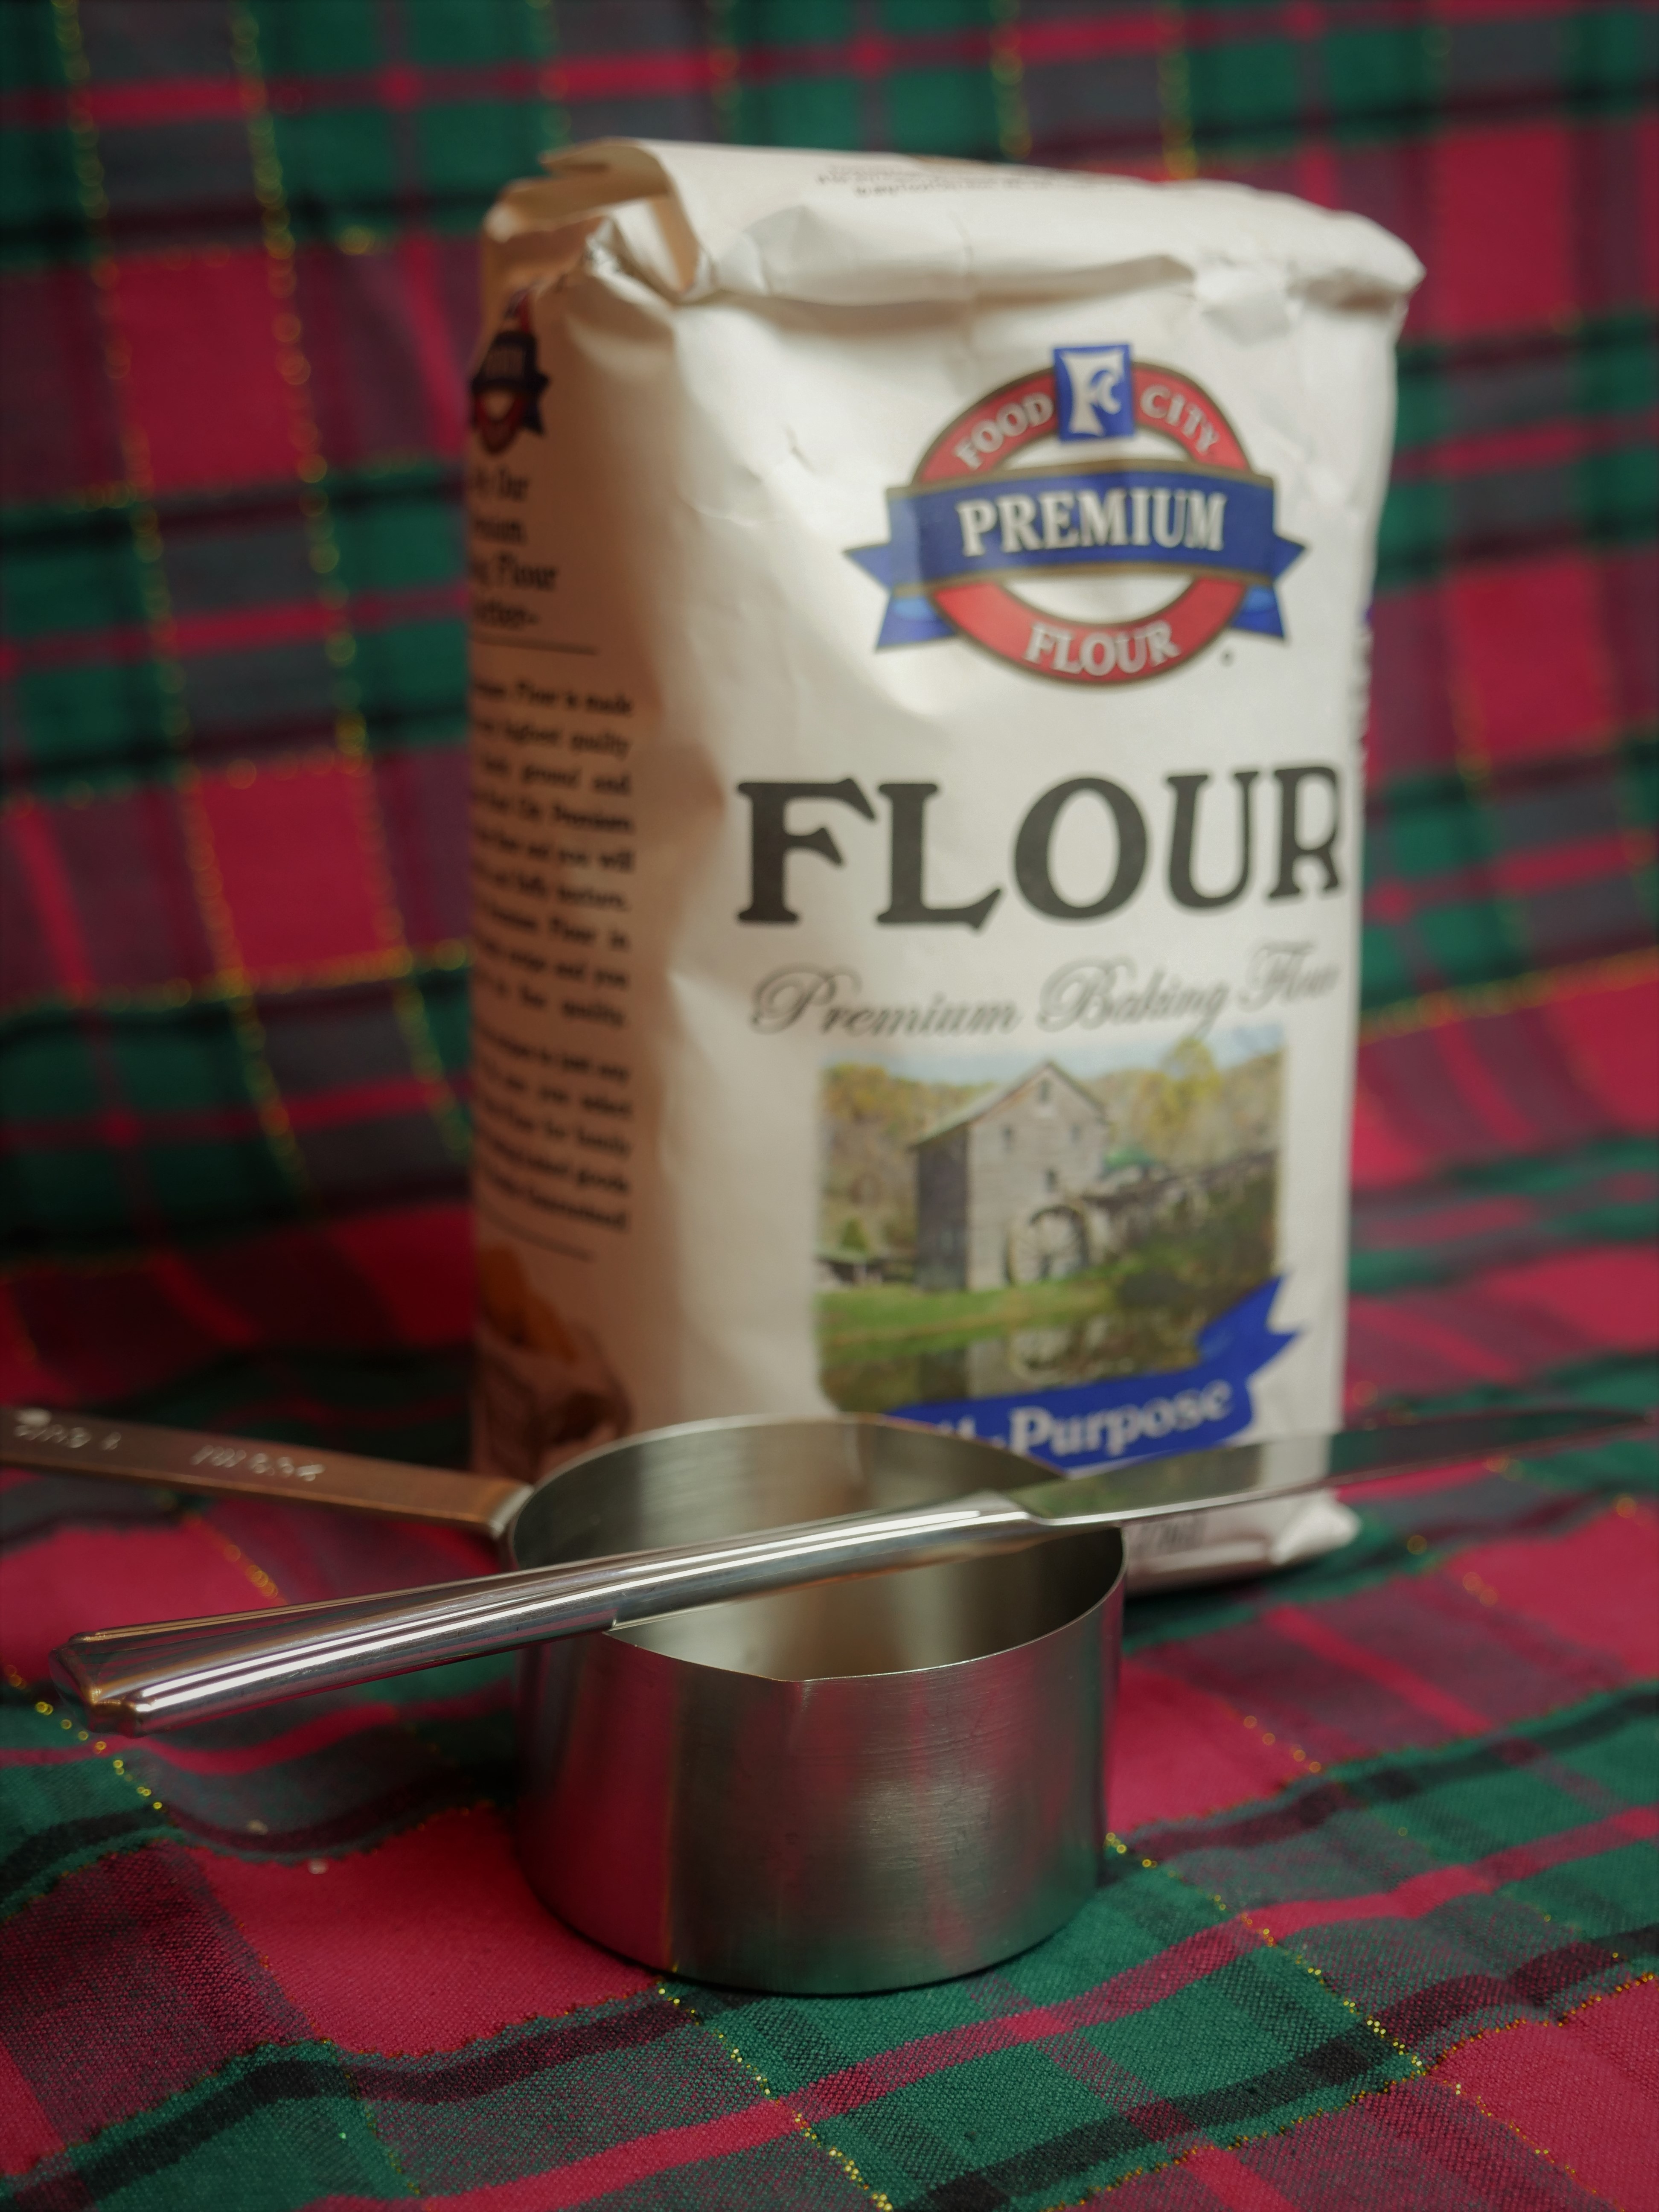
“When making turkey gravy, do you use All purpose flour or self-rising? When it says 1 cup of flour, how do you know which kind to use? AP, self-rising? Does it matter what measuring cup you use?”
I always use all-purpose flour when making gravy. If a recipe calls for flour and doesn’t say self-rising, use all-purpose. Plain and all-purpose are the same thing. I use measuring cups made for dry ingredients, not glass measuring cups with spouts for measuring. I use the scoop-and-scrape method for measuring flour, making sure my flour is ‘loose’ so I don’t pack it into the cup. It’s not brown sugar!

Chris and Chris ask (yes, two people named Chris both asked egg-nog questions!)
“Do you have a good egg nog recipe? Do you have one that is lactose free?”
Here’s a simple egg nog recipe, the traditional one first. And mine is kid-friendly, but you can certainly add a cup of your favorite spirits if desired, like rum, bourbon, or brandy. Take 6 egg yolks, 1 ¼ cup of sugar, and a ½ teaspoon of ground nutmeg in a heavy-bottomed pot. Whisk together then add 2 cups of half-and-half. Put on medium heat and stir. Keep stirring, and using a thermometer, heat until the mixture reaches 175 degrees, to kill any bacteria that might be in the eggs. Don’t overheat as it will curdle. Take it off the heat and pour in another cup of cool half-and-half. Add 2 teaspoons of rum flavoring. Pour through a sieve to remove any little egg globs and chill in the refrigerator for a few hours. If you want to add any spirits, do so after it’s chilled. Sprinkle a little fresh nutmeg on top of each poured cup when serving.
As Chris #2 asked for a lactose-free version, but one that still used milk products, I did a second one, substituting equal parts of whole lactose free milk and non-dairy creamer for the half-and-half. You could certainly use almond milk, soy milk, etc, and one of the soy or almond milk creamers as well.
Melody, Isabella, and Michelle ask:
“Do you have Gluten free dessert ideas? What about sugar-free/low carb, and vegan desserts?”
I confess that I am a traditional baker and not an expert in GF, SF, low-carb, and vegan recipes. But I have friends who are. One is a fellow competitor from the Next Great Baker, Aimee Anderson, who is now Sugar Free For Life. You can find some of her sugar-free, gluten-free, and low carb recipe at flabulesssisters.com. I also have an amazing niece, Tabitha Dutton, who is a blogger with a vegan passion. Check out her vegan recipes at vegabilities.com.
I do have one stand-by dessert for when I have vegan friends to serve, and it’s also gluten-free. Sorry, it’s not low-carb, but you could leave out the sugar or use a sugar-substitute of your choice.
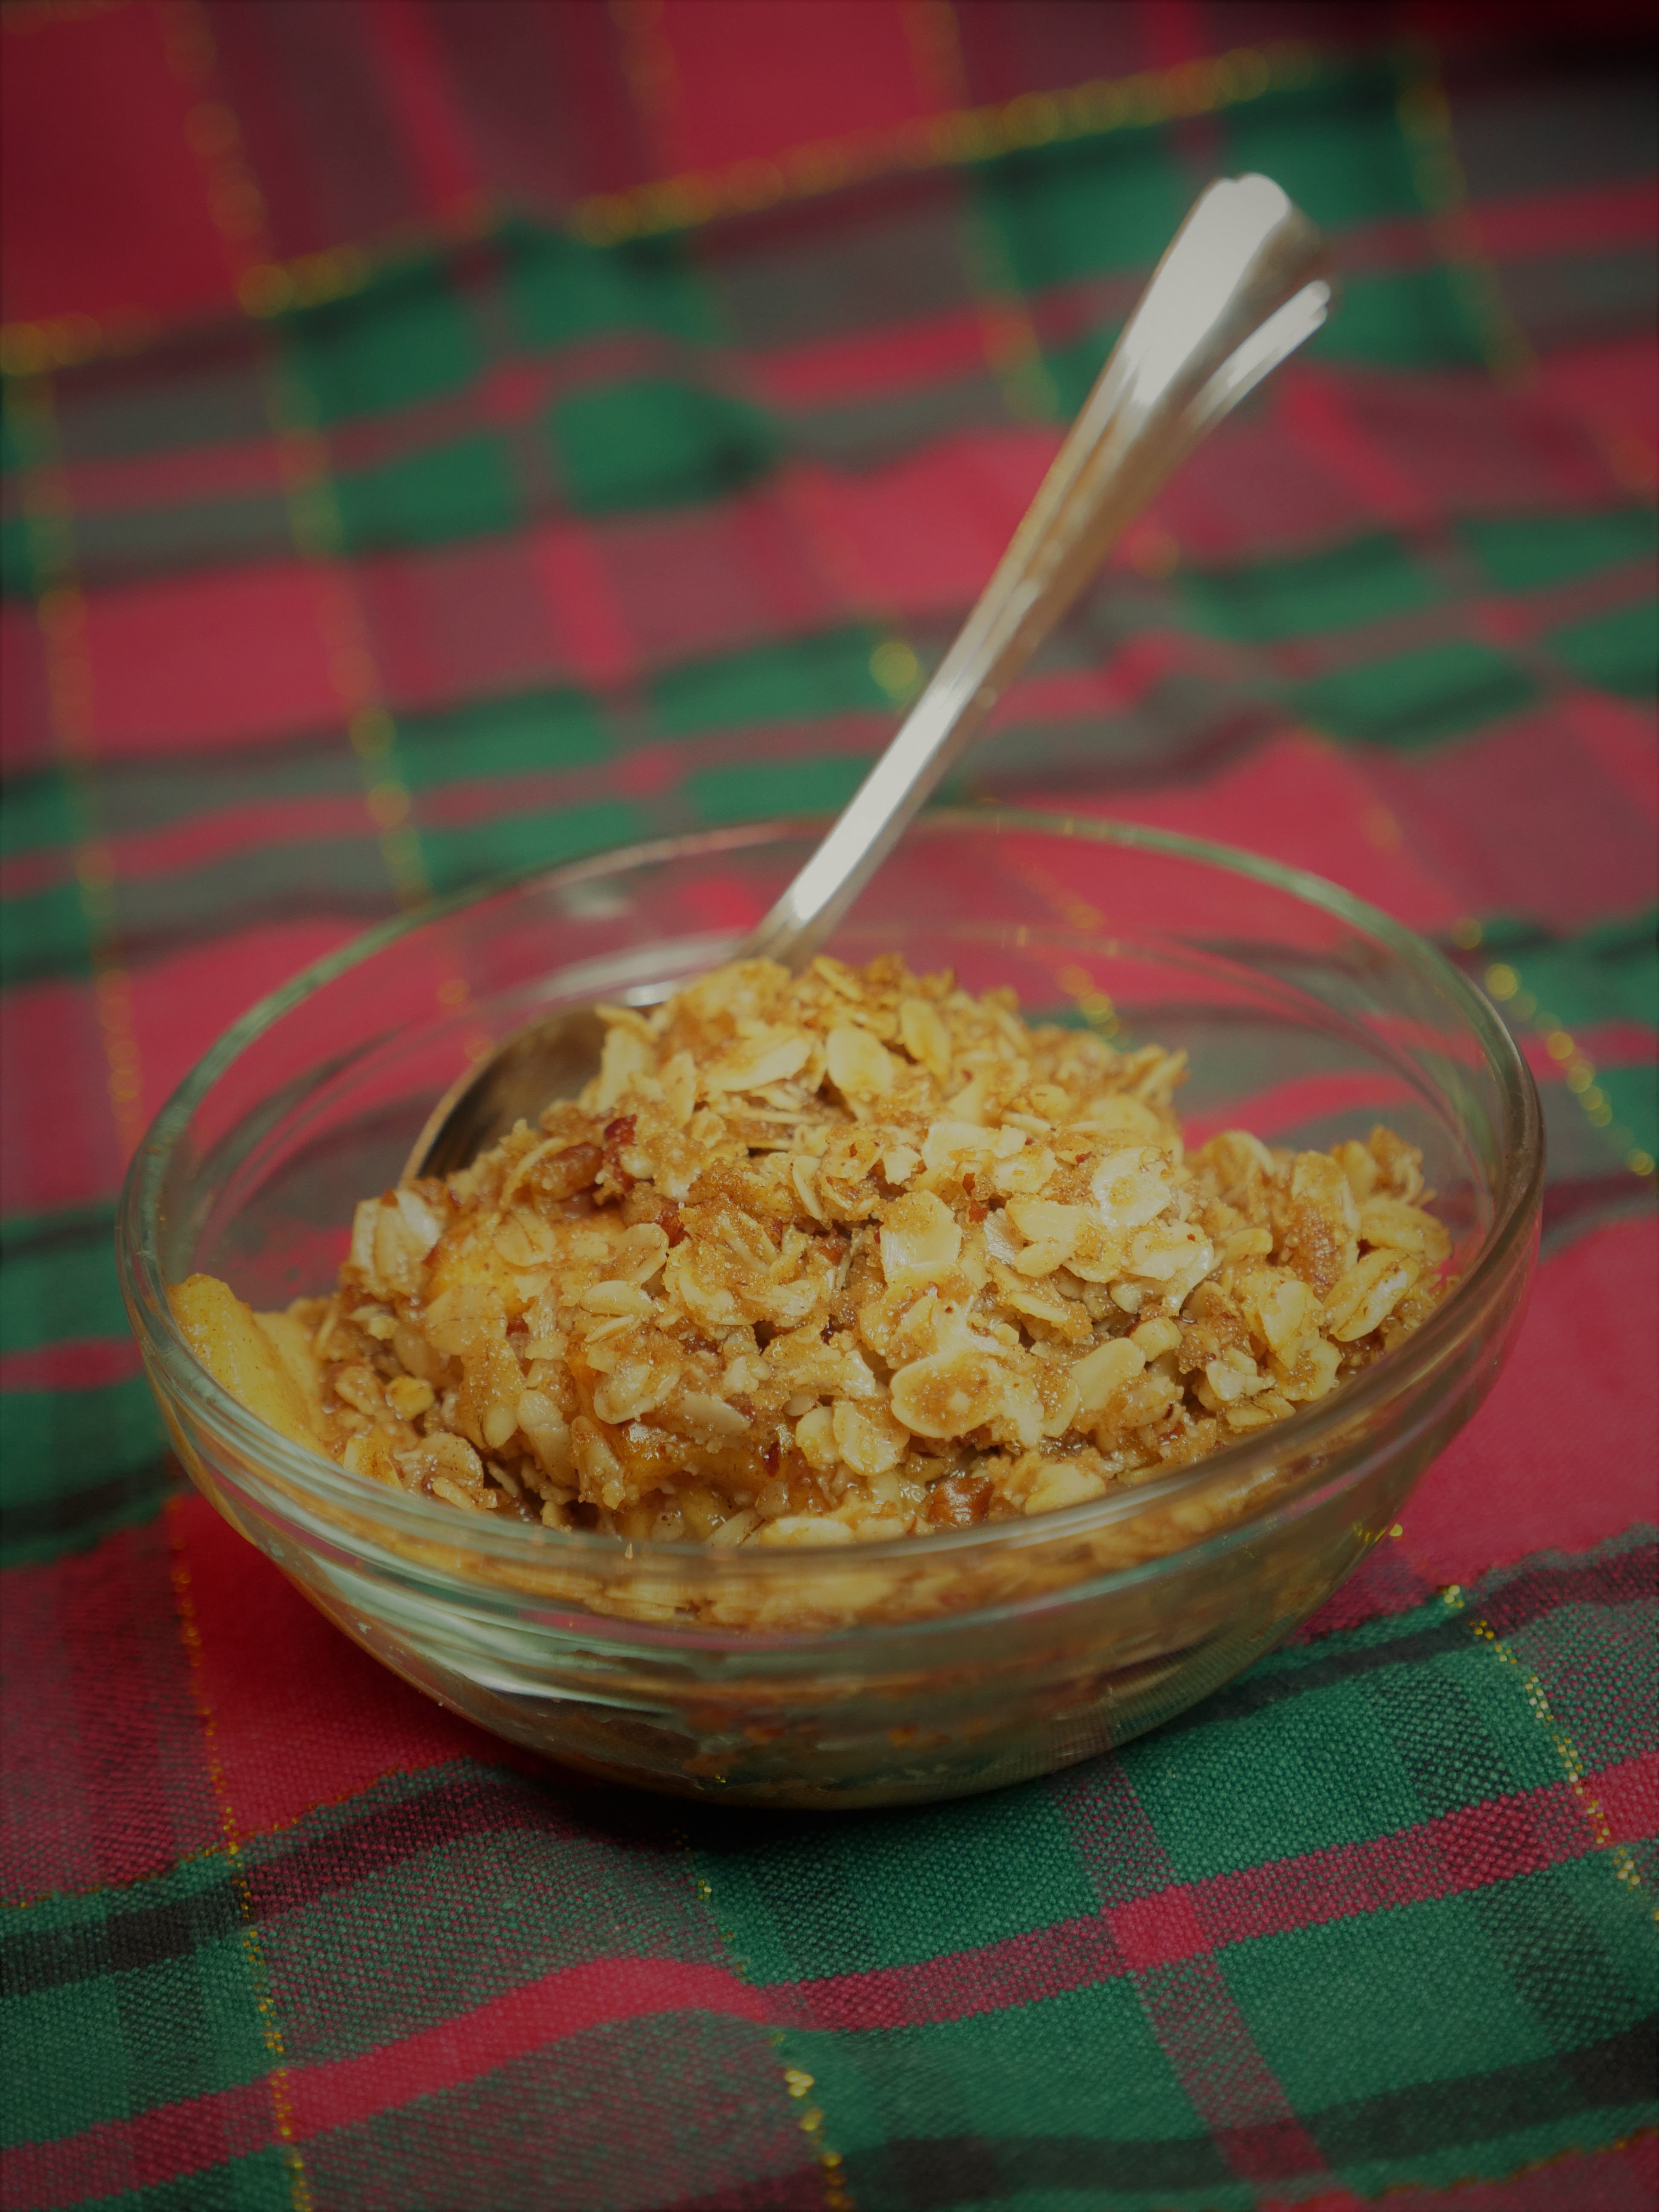
Apple Crisp, Vegan and GF
Peel, core and slice 3 to 4 tart apples, depending on size.
Toss in a tablespoon of corn starch, a teaspoon of apple pie spice, 4 tablespoons of sugar of your choice, or to taste, and fresh lemon juice to taste. Put in a small baking dish. Dot the top with a few small bits of coconut oil.
In a microwave-safe bowl, put in 1/3 cup GF oats, 1/3 cup sugar of choice (a raw or brown sugar would be best), 1/3 cup chopped nuts (I like pecans), and 2 tablespoons of coconut oil. You can add a few tablespoons of GF flour of any kind if you want your ‘crisp’ to clump together. Heat it in the microwave for 30 seconds or until coconut is melted, stir well, and place on top of apple mixture. Bake at 350 degrees or until apples are cooked through and top is brown.
Renea asks,
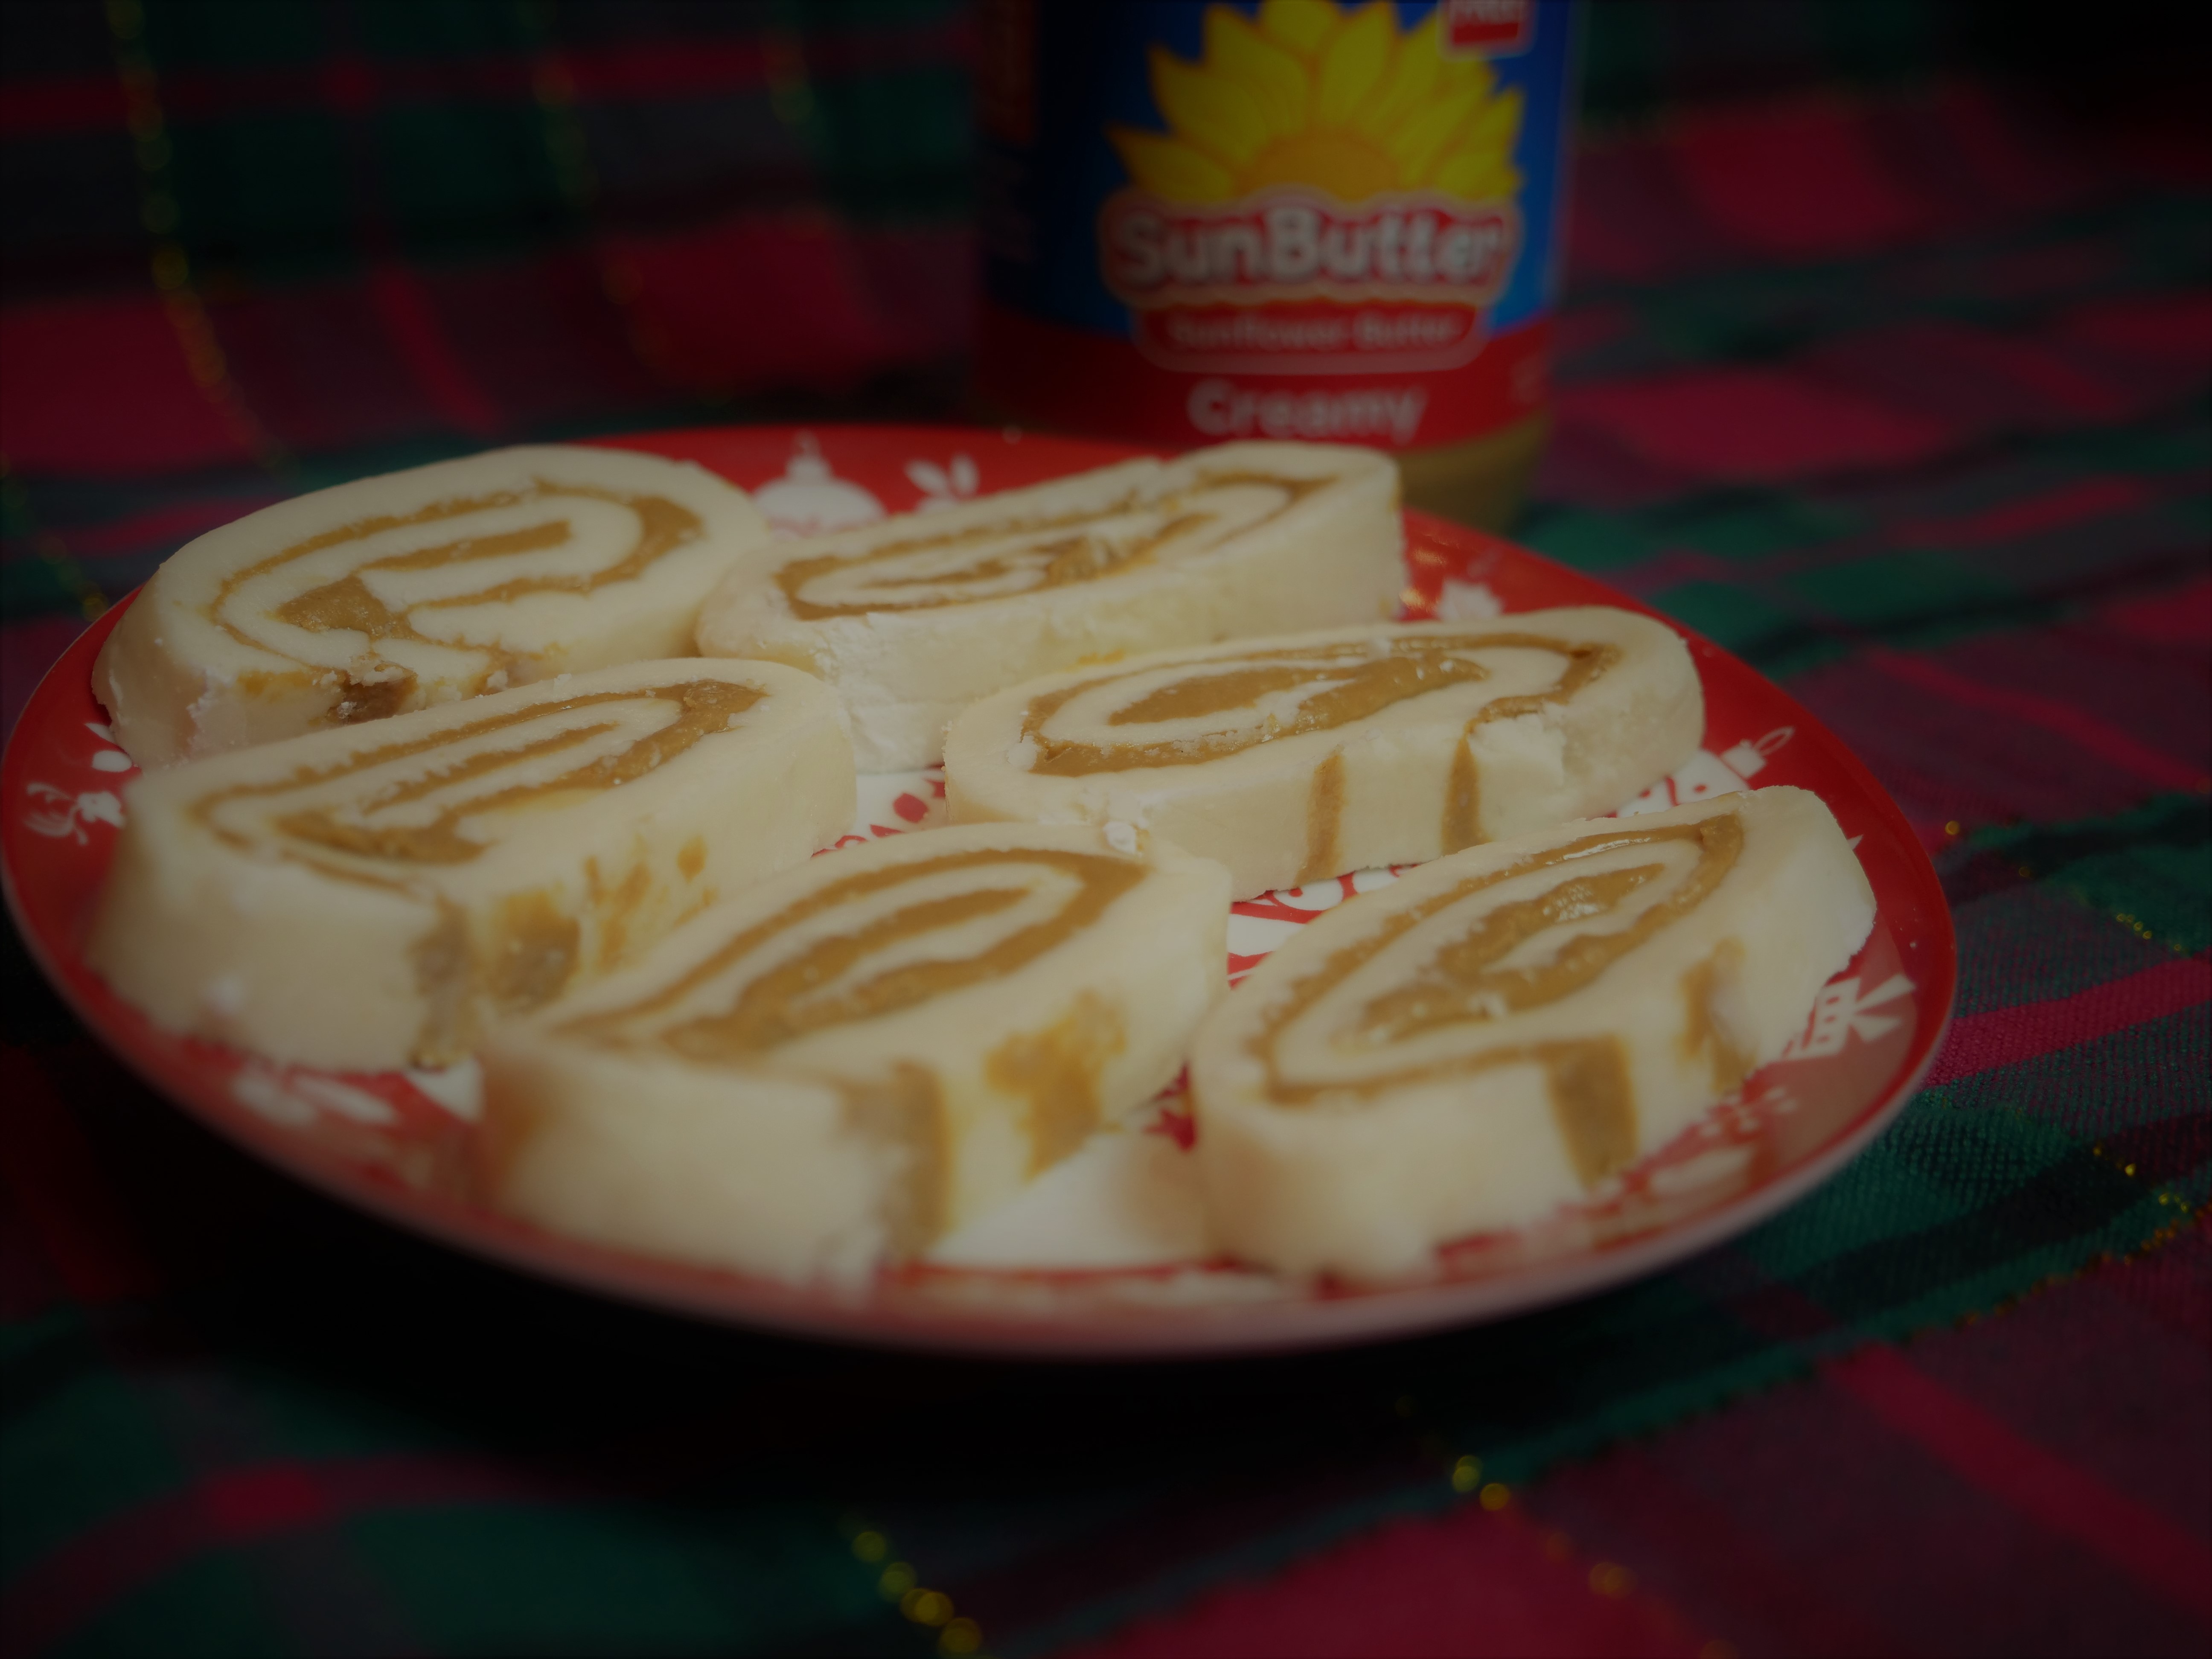
“Can you make pinwheels without using peanut butter and potatoes?”
Yes, you can. Here’s a link to a recipe I found. When I tried it, there was way more cream than needed, so I would start with 2 tablespoons of cream instead, and add a little more if needed. Otherwise, you have to at least double the amount of powdered sugar. For the peanut butter, I substituted a sunflower-based butter, but any non-peanut butter would do.
Melinda asks,
“I have an old family favorite for peanut butter fudge that calls for an 18-ounce jar of peanut butter, but they don’t make those anymore. How do I adjust my recipe using 16-ounce jar, without a scale?”
First of all, ask Santa to get you a scale for Christmas, as they are not very expensive and are VERY useful. I did the math, and you need to use an additional 3 1/2 tablespoons to get to 18 ounces.
Terri asks,
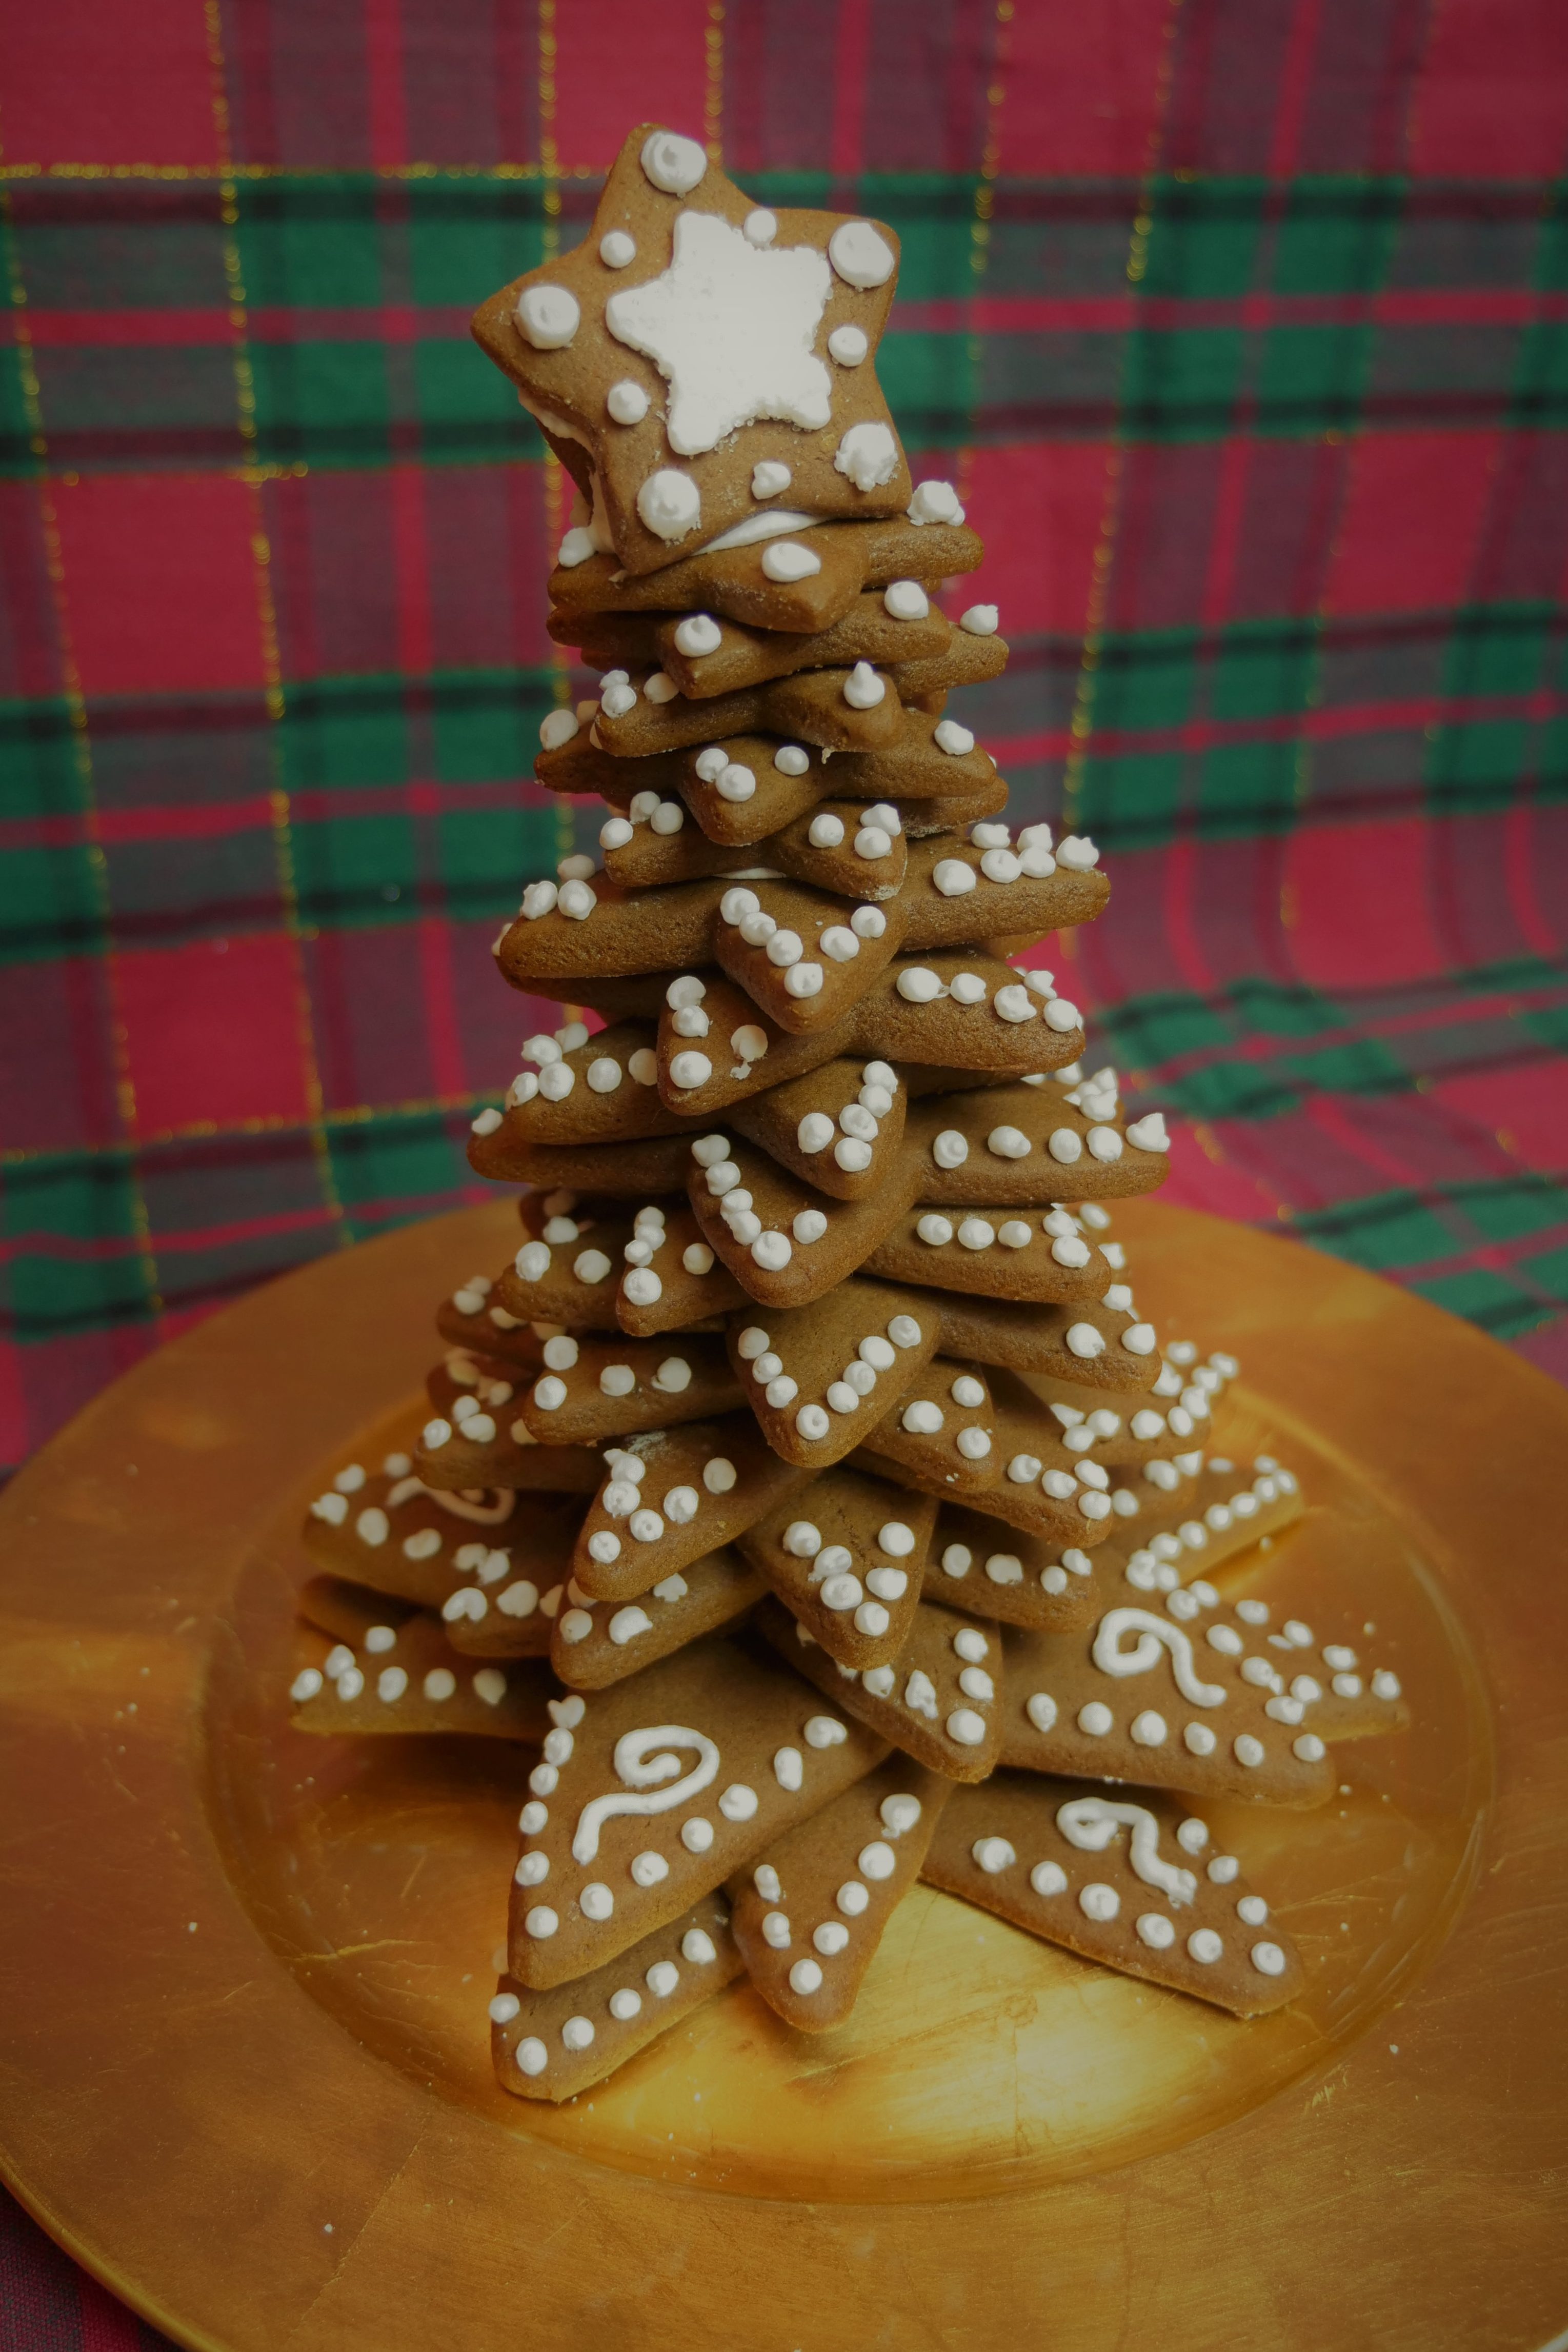
“Looking for ideas for easy “Christmas Tree” style edible center piece ideas. Thinking of a way to make a croquembouche look like a Christmas Tree.”
If you make a croquembouche for Christmas, send me a picture! I’m sure it will be fabulous. Here are two ideas if you decide to do something less involved:
Idea #1: Stacked Cookie Christmas Tree
Bake cookies, gingerbread like I did, or sugar cookies, using star shapes in graduated sizes. I used royal icing to decorate, and since I had to transport mine to a television studio, I used the royal icing to ‘glue’ it together. If yours doesn’t have to travel, remember royal icing sets up like concrete, so use as little as possible to hold it together, if any at all, or your guests won’t be able to remove cookies to enjoy.


Idea #2: Styrofoam Tree of Goodies
I found a 9 inch green Styrofoam cone and was surprised at how many treats I could attach. One option is to use premade cream puffs, found in the frozen section, (you can certainly make your own), and attach them by putting a toothpick into the cone, then placing the cream puffs. I started at the bottom and worked my way up. Another option is to do the same thing with wrapped chocolate candies. The same concept would work with strawberries and other fruit, donut holes, etc. I was surprised at how easy this was to do. I taped the bottom of my cone to a plate and kept my tree in the refrigerator (for the cream puffs) until ready to use.
Robin asks,
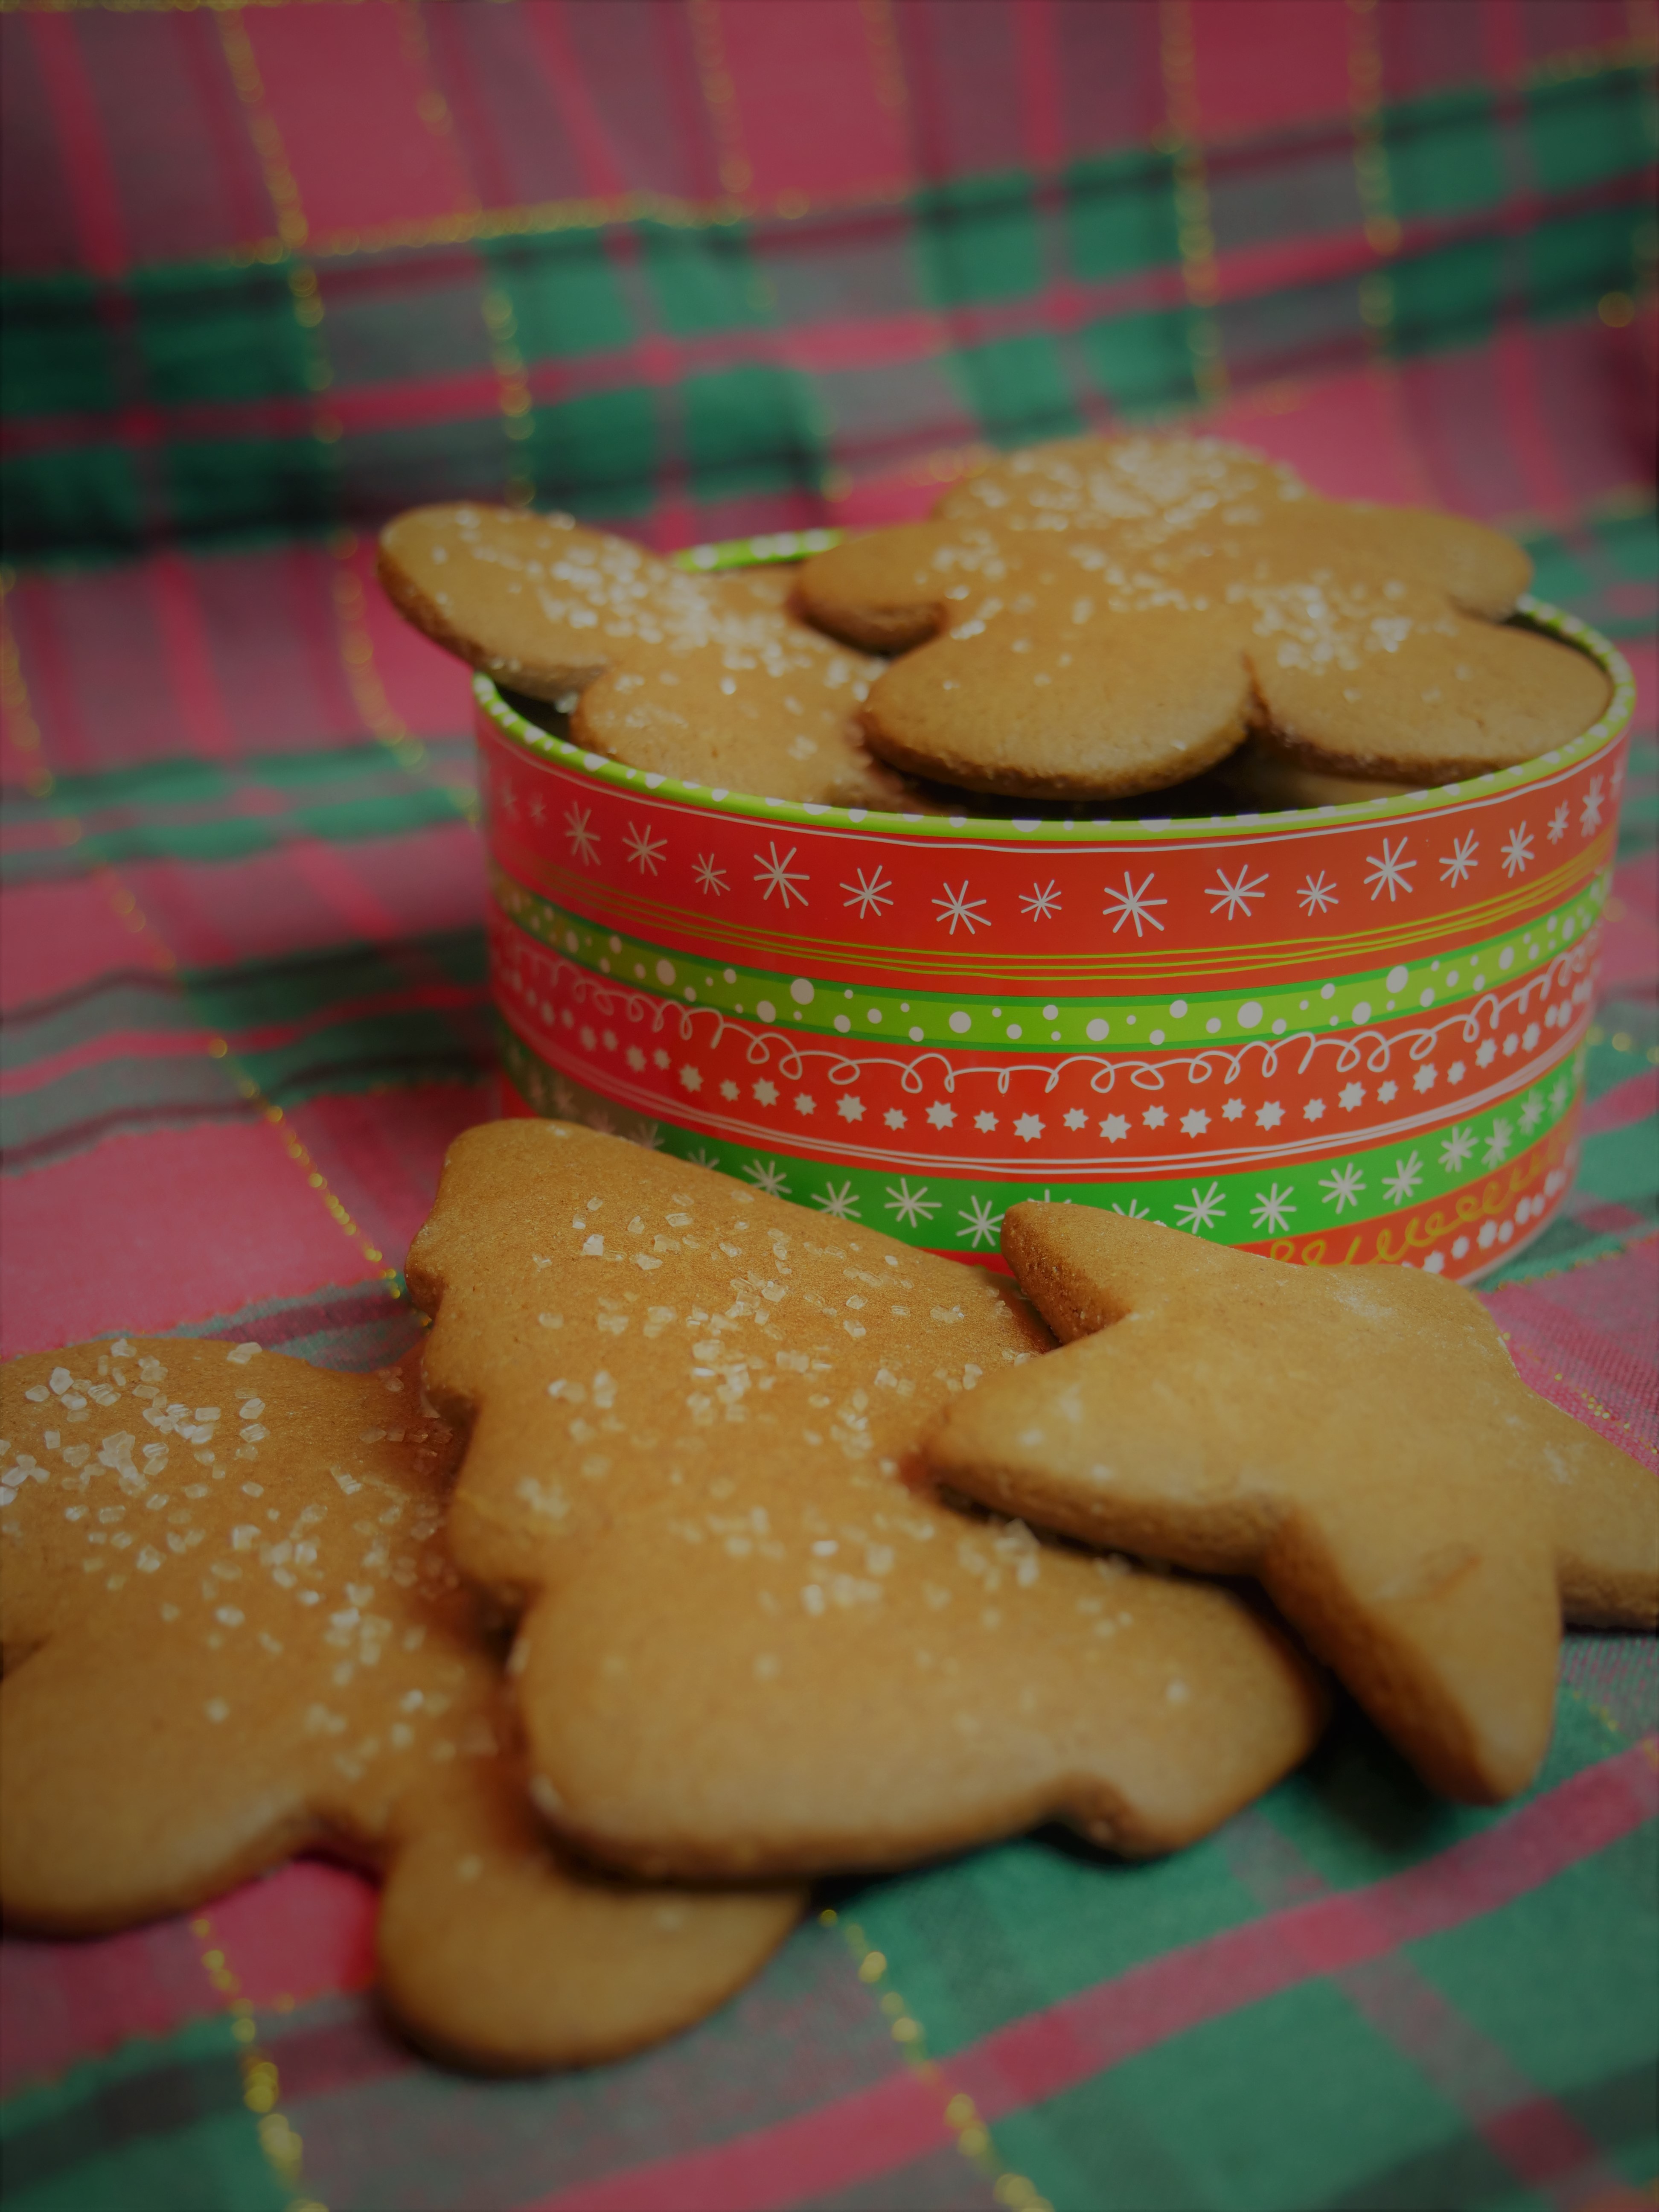
“Do you have a good gingerbread man recipe?”
Here’s the gingerbread recipe I have used for many years. It’s from the Joy of Cooking Christmas Cookies.
Gingerbread Cookies
Line baking sheets with silicon mats or parchment paper. In a bowl, whisk together:
3 cups all-purpose flour
1 ½ teaspoons baking powder
¾ teaspoon baking soda
¼ teaspoon salt
1 tablespoon ground ginger
1 ¾ teaspoons ground cinnamon
¼ teaspoon ground cloves
In a mixer, cream together:
6 tablespoons unsalted butter, softened
¾ cup packed brown sugar
1 large egg
Beat into this mixture:
½ cup molasses
2 teaspoons vanilla
1 teaspoon grated lemon zest
Gradually mix the dry ingredients with the wet ingredients in the mixer, until the ‘dry’ disappears. Wrap the dough in plastic wrap and let set on the counter for 2 hours or refrigerate for up to 4 days, letting the dough reach room temperature before rolling it out. Heat your oven to 375°F and make sure your pans are ready. Sometimes this dough can seem a bit soft as you get ready to roll it, so don’t hesitate to gently add a little more flour as you roll it out to help it be more cohesive.
On a floured surface, roll out the dough ¼ inch thick, making sure the dough underneath isn’t stuck to your counter, adding extra flour under it if needed. Cut out with your favorite cookie cutters, but keep a few things in mind: bake cookies of similar sizes together, so they get done at the same time; to minimize re-rolling of dough, I put my cookie cutters on the dough, starting at the edges, and as close together as possible, then press down on them once I’ve used all the empty space I can. You can use a thin spatula to help you remove the cut cookies. If dough seems too warm and wants to come apart, you can chill it briefly.
Put unbaked cookies on your sheet about 1 ½ inches apart; otherwise, they will grow together. Garnish with sprinkles if desired and bake for 7 to 10 minutes, just until set and slightly darker. If you want a softer cookie, pull them closer to 7 minutes. If you like a crisp cookie, pull them closer to 10 minutes or a little after. Even one or two minutes makes a difference! Let cookies cool for 5 minutes at least before you remove them to a rack to cool.
Becca asks,
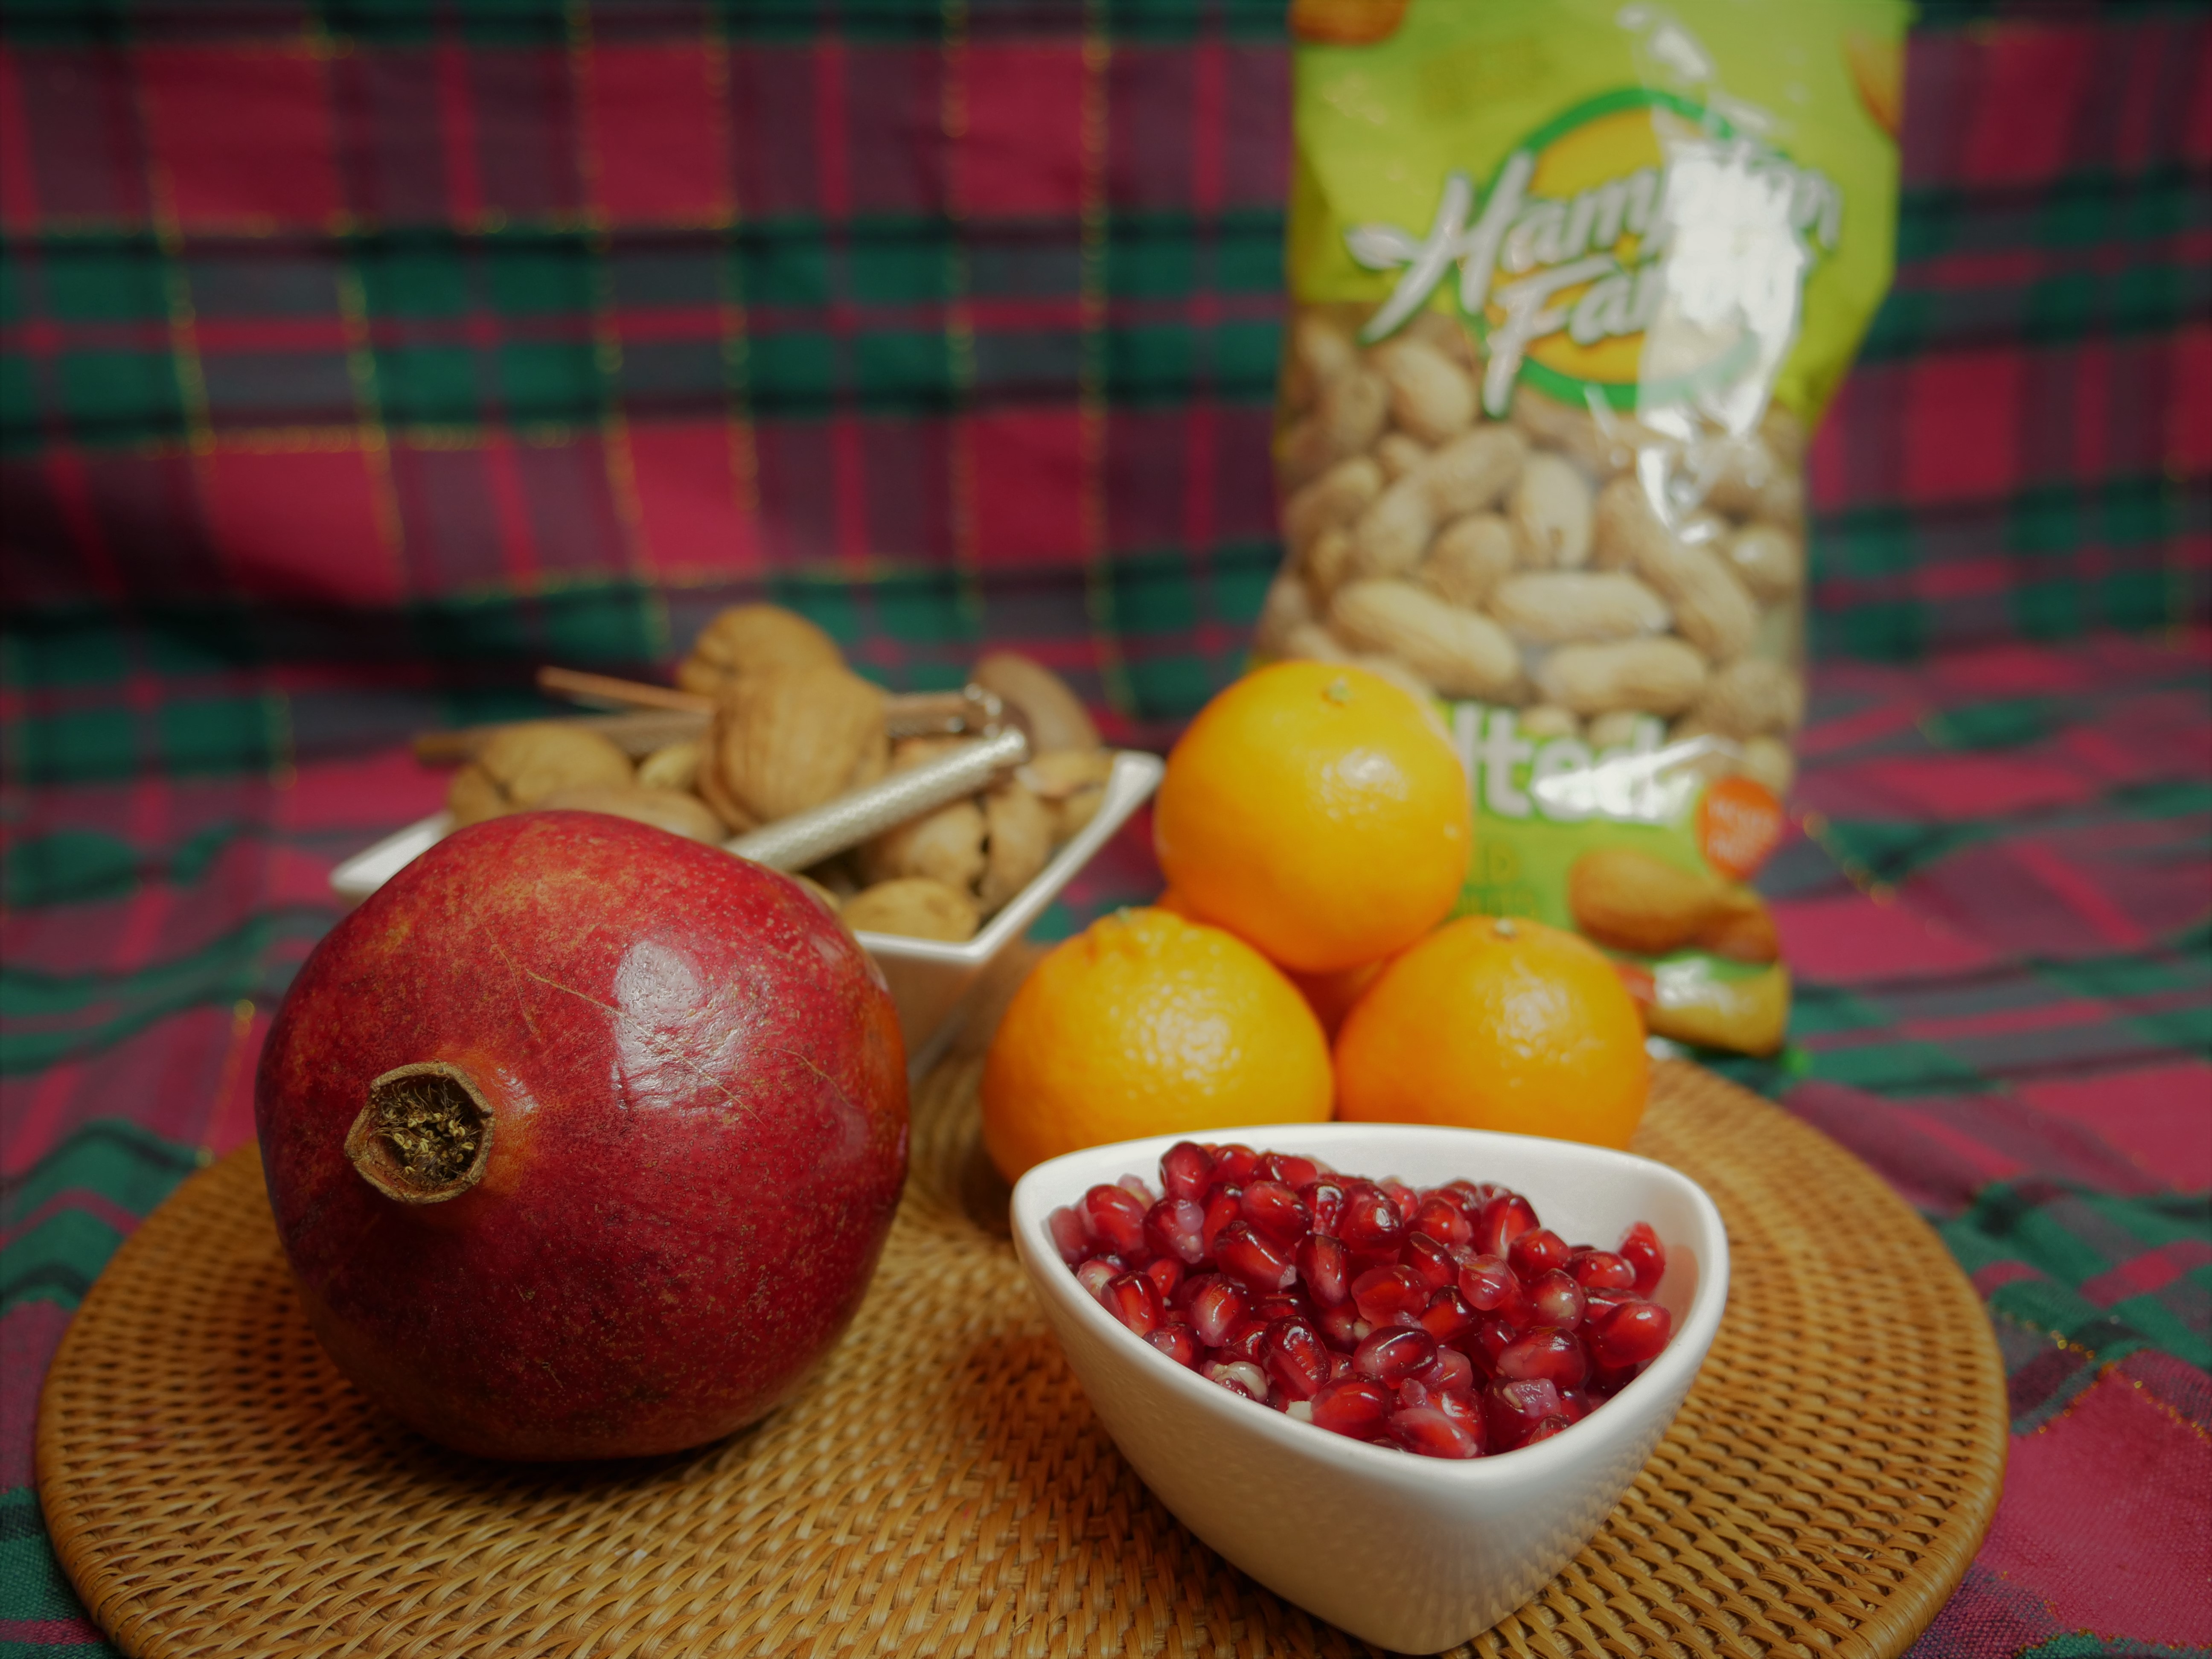
“Is there a healthy snack for the holidays that’s NOT a veggie tray?”
Such a good question! Don’t we all wish that pecan pie, cinnamon rolls, and fudge were the new superfoods? But take heart, there are some seasonal treats that are easy to love. For one, there is fruit. Citrus is in season, and the little Cuties are perfect for snacking, being easy to peel, super sweet, and usually seed-free. I LOVE pomegranates, and there are in season, too. I actually ask for them as Christmas presents, with the seeds removed for me.
I grew up with bowls of nuts in the winter, along with a nutcracker and pick to get at the meats. And popping some jumbo peanuts into the oven for a few minutes will fill the house with a lovely aroma and give you a protein snack that is comforting to boot.
Brianna asks,
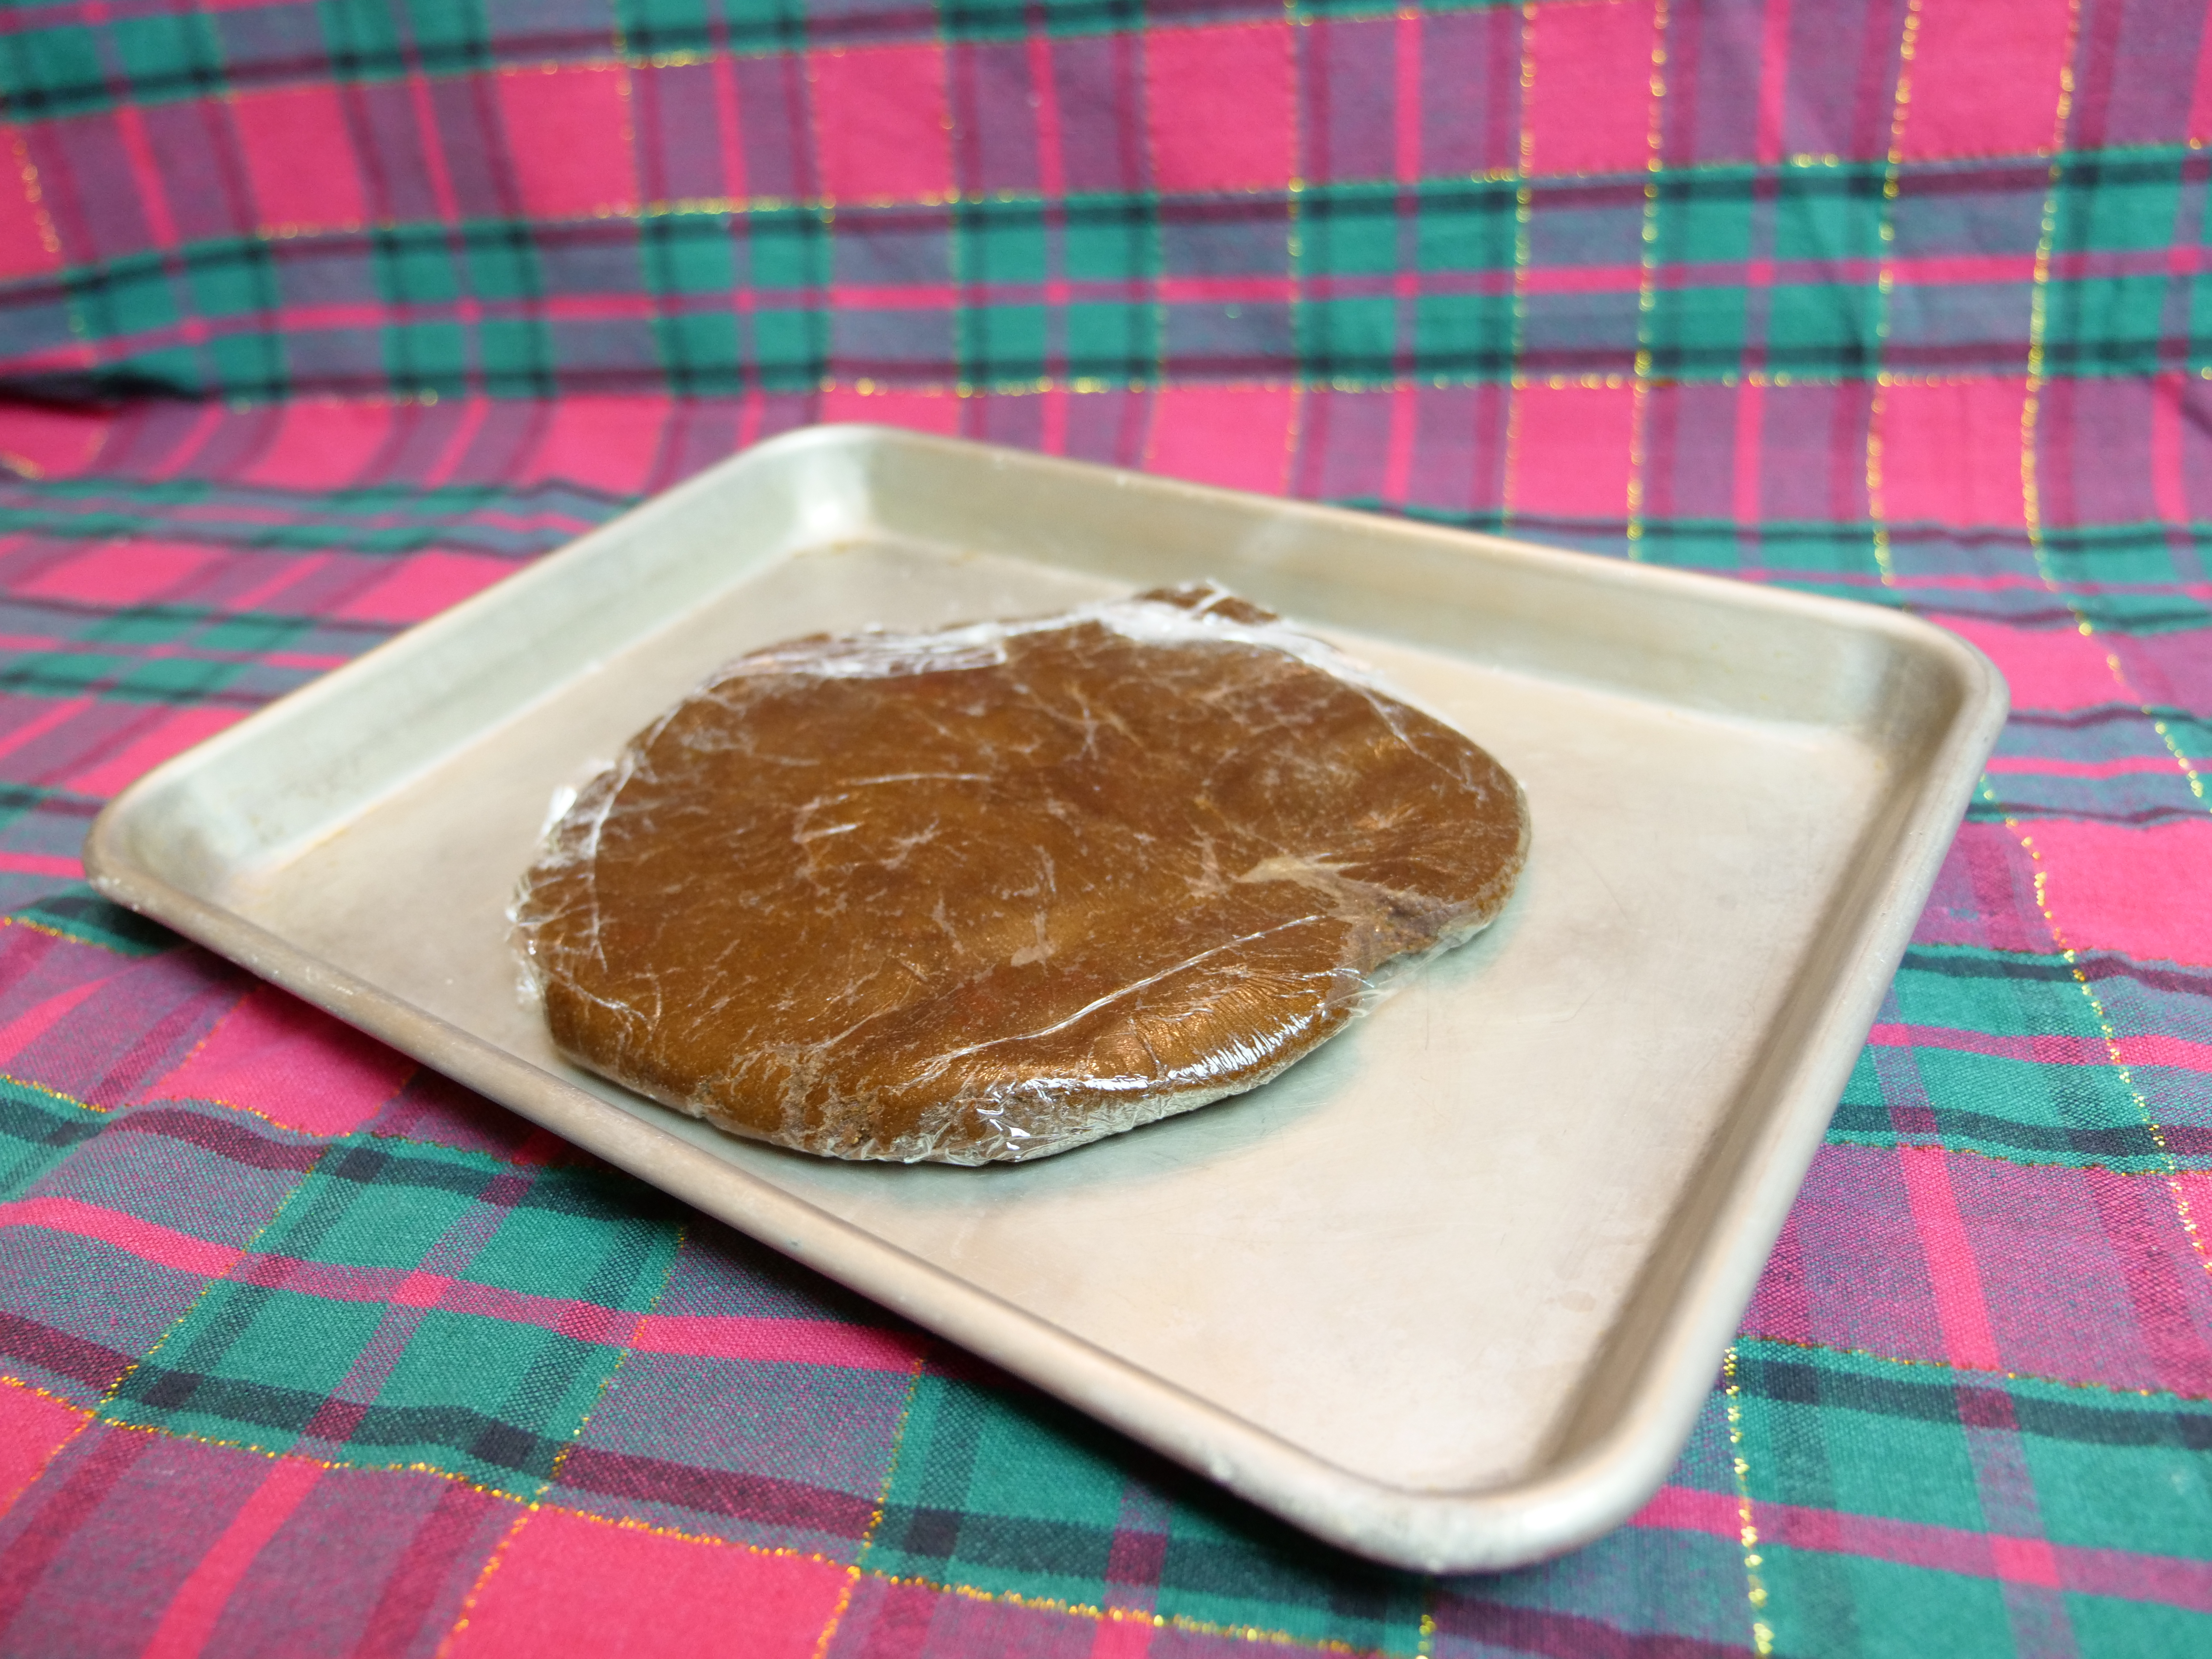
“If a recipe calls for chilling dough overnight, but I don’t have time, is there any way to shorten the length of time it needs to chill?”
This has happened to me many times. When I’m in a rush, I either roll out my cookie dough between two sheets of plastic, or make a thin circle of my dough and wrap it in plastic, then place it on a metal cookie sheet in the freezer. You can skip the metal cookie sheet if you are tight on space. Check in 30 minutes to see if it’s chilled enough.
This doesn’t work for yeast doughs, though I got away with a four-hour chill in the fridge for brioche once. (I would never do the freezer method with yeast doughs needing to chill, as the yeast would become inactive during that time, defeating the purpose of a slow rise.) Overnight rising in the refrigerator allows yeast doughs to develop more flavor, so try to not skimp on the time for those.
Sandra asks,
“Can you freeze cakes, with the frosting on it, of just the cake and frost it later? Does the cake need to defrost first?”
By all means, freeze your baked cakes. That’s what many professional bakers do, even the Cake Boss. But just the cakes, not frosted ones. Let you cake cool completely, then wrap it well in plastic. I put mine on cardboard circles, so they will keep their shape. You don’t have to let them thaw to frost them. NEVER freeze a cake with fondant on it, because when it thaws out, the fondant will get wet and sad. Very sad.
Tracy asks,
“I need ideas for a holiday cookie exchange.”
You’re in luck, because Daytime just aired the December installment of Party in a Pinch, where I went to Anna Zook’s lovely home and I showed her four yummy recipes. The video and recipes will be posted on Monday, the 18th. Until then, check out their website here.
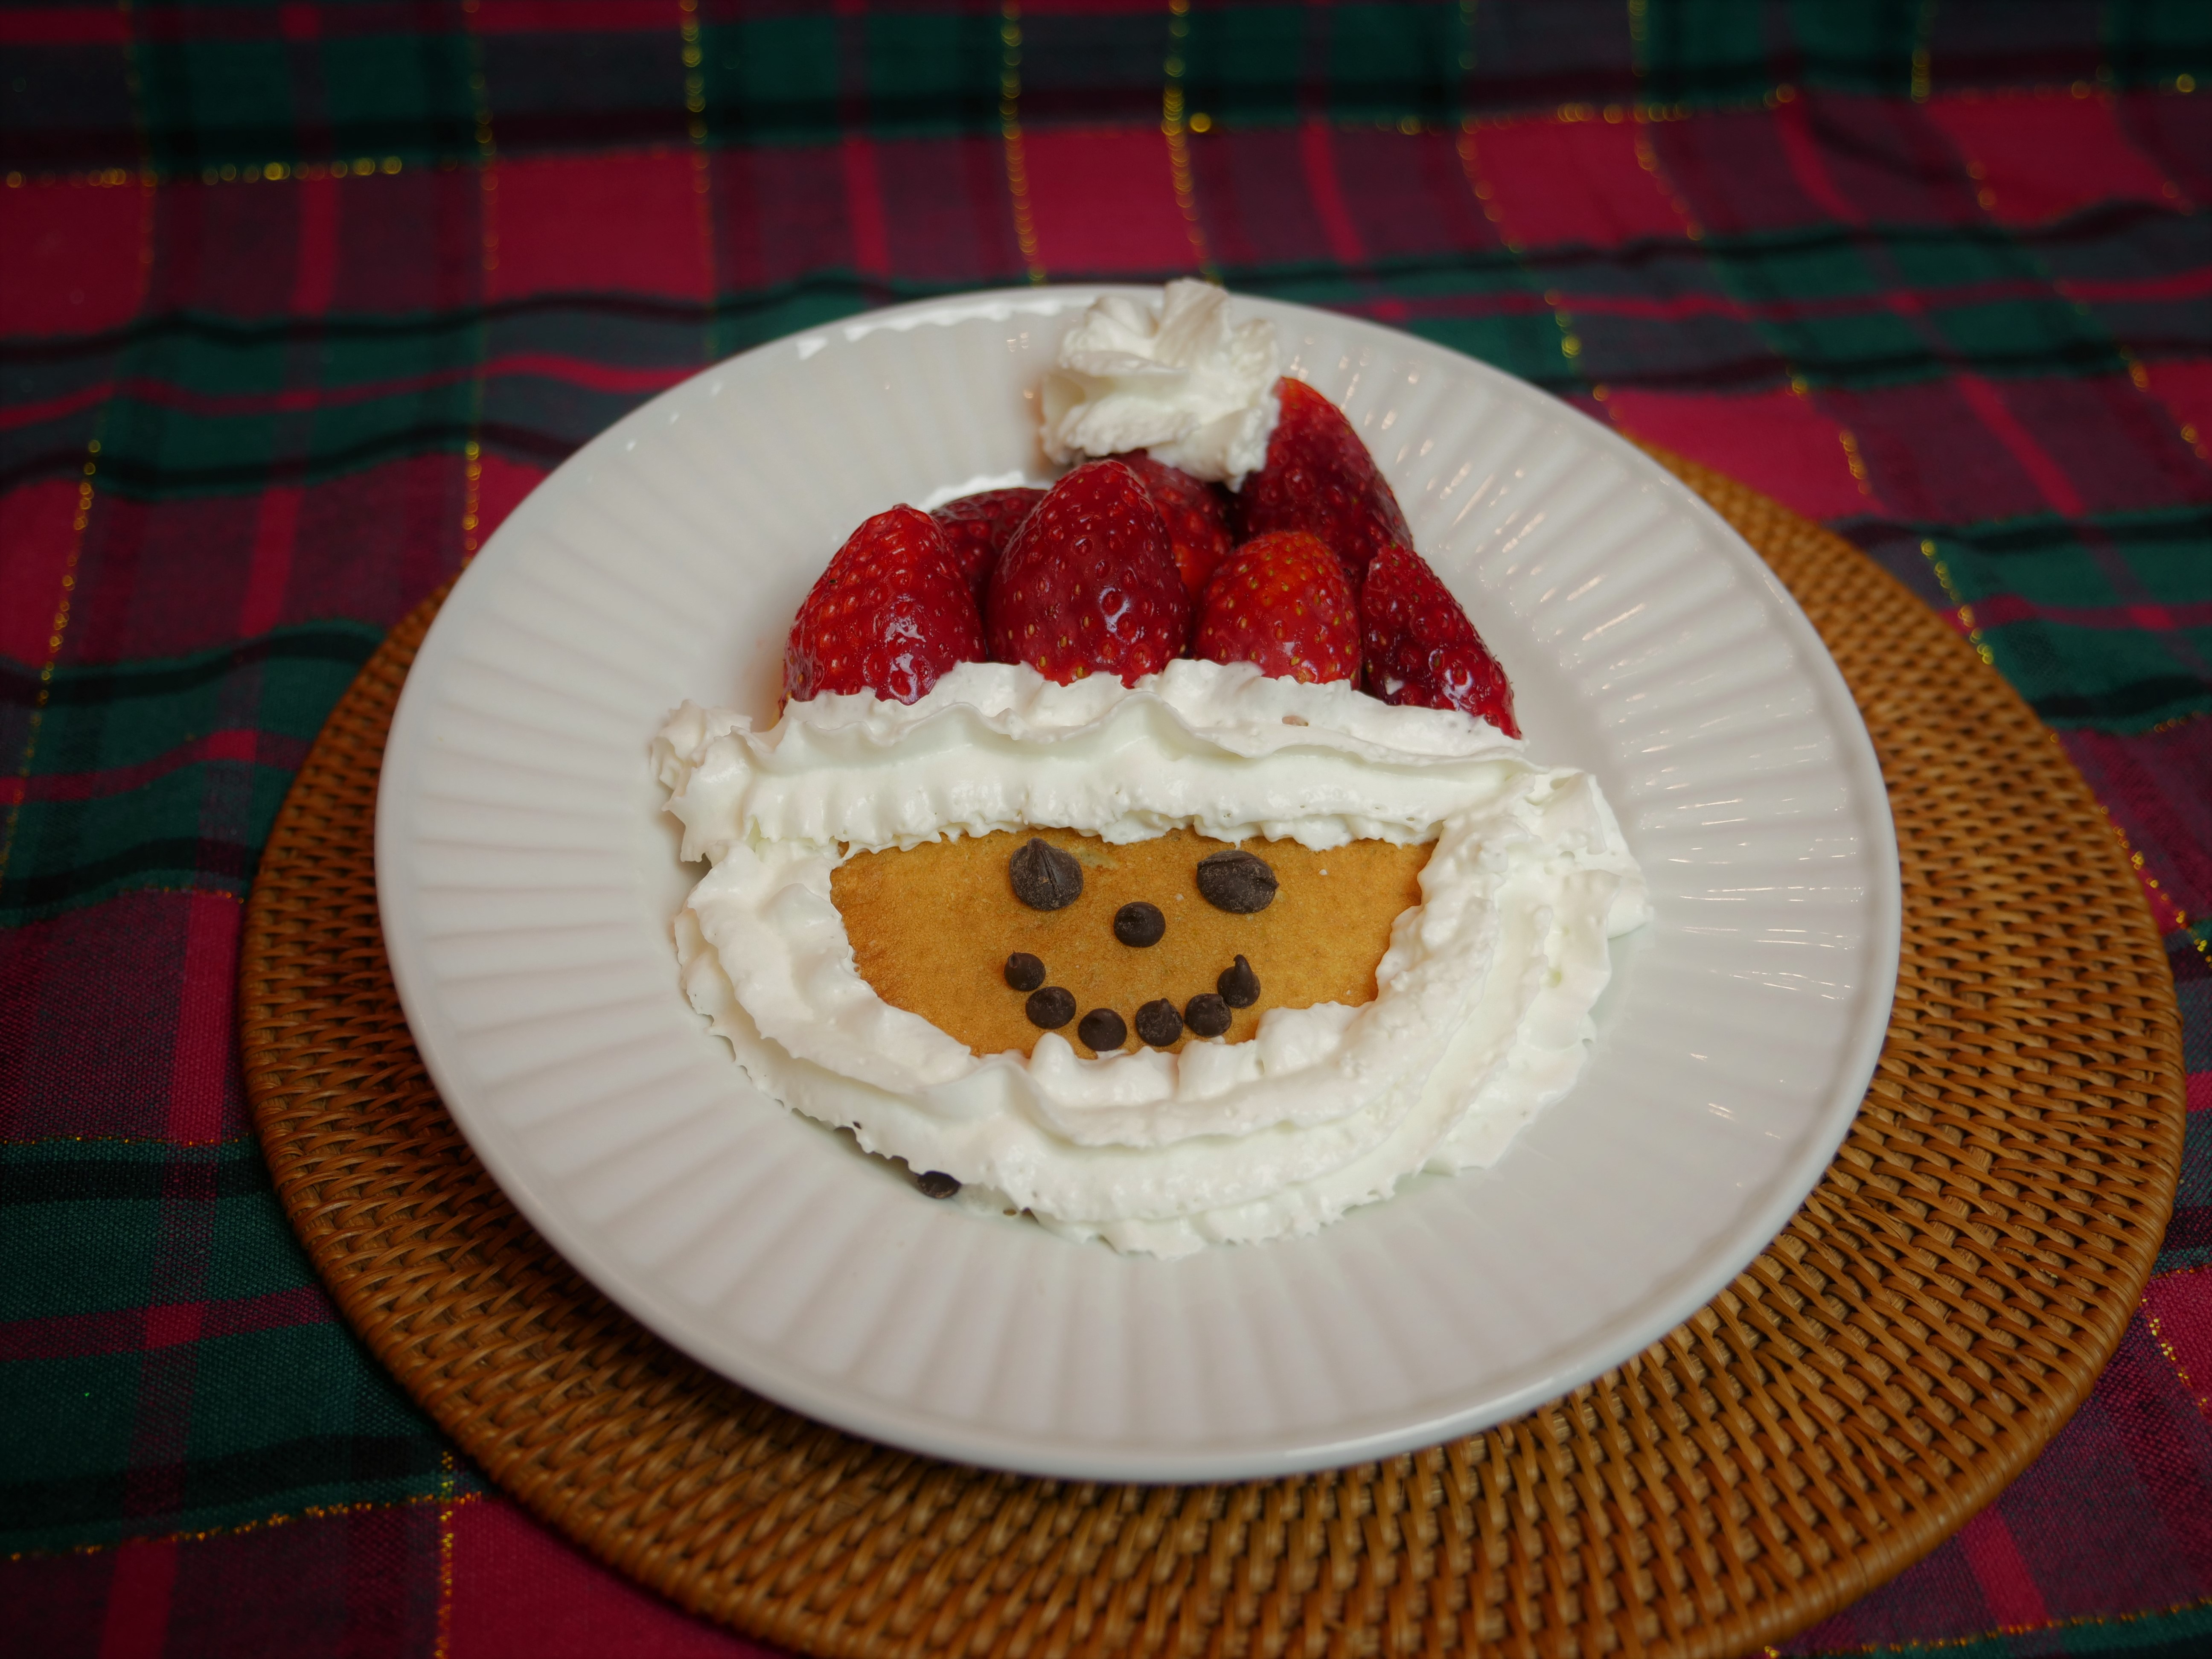
Warren asks,
“What can a clueless guy make for his wife or family for the holidays that is danger free (won’t burn the house down), tastes good and hard to make it wrong?”
Santa Pancakes are your answer. I’ve included a simple pancake recipe below. It’s actually the first recipe I used with my Baking Basics class at ETSU. If that’s too challenging, use a mix or buy frozen pancakes. Use sliced strawberries, a few chocolate chips, and a can of whipped cream to create a fun and tasty treat your kids will love, and hopefully, your wife. You can use sliced bananas for the beard if you want.
Even if your homemade pancakes look awful, they’ll be mostly covered by strawberries, whipped cream and chocolate chips so no one will notice, especially if you put the burnt side down.
Enjoy!
Buttermilk Pancakes
Yields about 9 small pancakes
Preheat your griddle or skillet. In a bowl, beat:
1 egg
Add and whisk in:
1 cup buttermilk
2 tbsp. vegetable oil
In another bowl, whisk together:
1 cup all-purpose flour
1 tbsp. sugar
1 tsp. baking powder
½ tsp. baking soda
½ tsp. salt
Pour the wet ingredients into the dry ones and whisk just until the dry ingredients disappear. A few lumps may remain. You can add more buttermilk if you want the batter to be thinner.
To know if your griddle is ready, sprinkle a few drops of water on the surface. If they ‘dance’, it’s ready. If they don’t, it’s not hot enough. If they instantly disappear, your griddle is too hot. You can use non-stick spray if you like, put on right before use. (Butter tends to burn.)
Use a ladle or scoop and put about a ¼ cup of batter down on your griddle for each pancake, leaving space so they don’t grow together.
When the edges start to appear dry and bubbles form and break on the surface, your pancake is ready to flip. The second side takes little time to finish. Remove pancakes to a serving plate and cover with aluminum foil to keep them warm until all pancakes are done.
For variations, you can sprinkle chocolate chips, blueberries, chopped pecans, crumbled bacon or even whole kernel corn on the cooking pancakes before you flip them, or mix them into the batter. At my house I prefer the ‘sprinkling’ method so you can use the same batter and create multiple types of pancakes.
If you don’t have buttermilk on hand, you can substitute ¾ cup regular milk and use 1 tbsp. of baking powder, leaving out the soda completely.
Comments 4
Thank you Julie!
Author
Thanks, Jenny, for the question. And may your gravy never have lumps!
Blessings,
Julie
Great, as always!
Author
Thank you!